



Moving your vals to bunny.net

Jamie Barton

November 16, 2026
Val Town lets you write a function in the browser and get a URL back a second later. I've loved that idea since the first time I used it… small pieces of code with a database and file storage close at hand, and no server to look after.
On November 10, Steve Krouse announced that Val Town is winding down.
Bunny Database is built on libSQL too. Your vals already speak its language, so most of the move is about where the code runs and where the files live, and the database queries come along as they are.
Before we begin, there are a few dates that matter:
| Date | What happens |
|---|---|
| Nov 10, 2026 | New signups and plan upgrades closed |
| Dec 10, 2026 | Read-only mode |
| Jan 10, 2027 | All other services end |
| Feb 1, 2027 | Val Town is open-sourced |
Val Town gives no later date for SQLite and blob storage, so plan to have your data copied before January 10.
Where each piece goes
A val maps onto three bunny.net products:
- the HTTP handler runs as an Edge Script,
- the SQLite tables move to Bunny Database,
- and blobs become files in Bunny Storage.
| On Val Town | On bunny.net | What changes in your code |
|---|---|---|
HTTP trigger: a default export that takes a Request and returns a Response |
A standalone Edge Script that passes a handler to BunnySDK.net.http.serve() |
One wrapper line |
std/sqlite, an @libsql/client instance |
Bunny Database, built on libSQL | The import and the client setup |
std/blob, backed by Amazon S3 (scoped) or Cloudflare R2 (global) |
A Bunny Storage zone through @bunny.net/storage-sdk |
A small helper with the same method names |
Environment variables read with Deno.env.get() |
Environment variables and secrets on the script, read with process.env |
Where you read them |
Each script gets the standard Web APIs, and code written against Request, Response, and fetch keeps working, so most of the migration is swapping imports.
The guide follows the dashboard first, since that's closest to how Val Town felt. If you'd rather stay in the terminal, the same steps are collected into one CLI run near the end, followed by a prompt you can hand to a coding agent.
Port your code into one file
The goal of this step is a single main.ts that you can paste into the dashboard and keep editing there, the way you did on Val Town.
The HTTP handler
An HTTP val's entry file default-exports a function that takes a Request and returns a Response:
export default async function (req: Request): Promise<Response> {
  return Response.json("hello, http!");
}
A standalone Edge Script uses the same function. Pass it to serve():
import * as BunnySDK from "npm:@bunny.net/edgescript-sdk";

async function handler(req: Request): Promise<Response> {
  return Response.json("hello, http!");
}

BunnySDK.net.http.serve(handler);
Vals built on Hono keep their routes. Hand app.fetch to serve():
import * as BunnySDK from "npm:@bunny.net/edgescript-sdk";
import { Hono } from "npm:hono";

const app = new Hono();
app.get("/", (c) => c.json({ ok: true }));

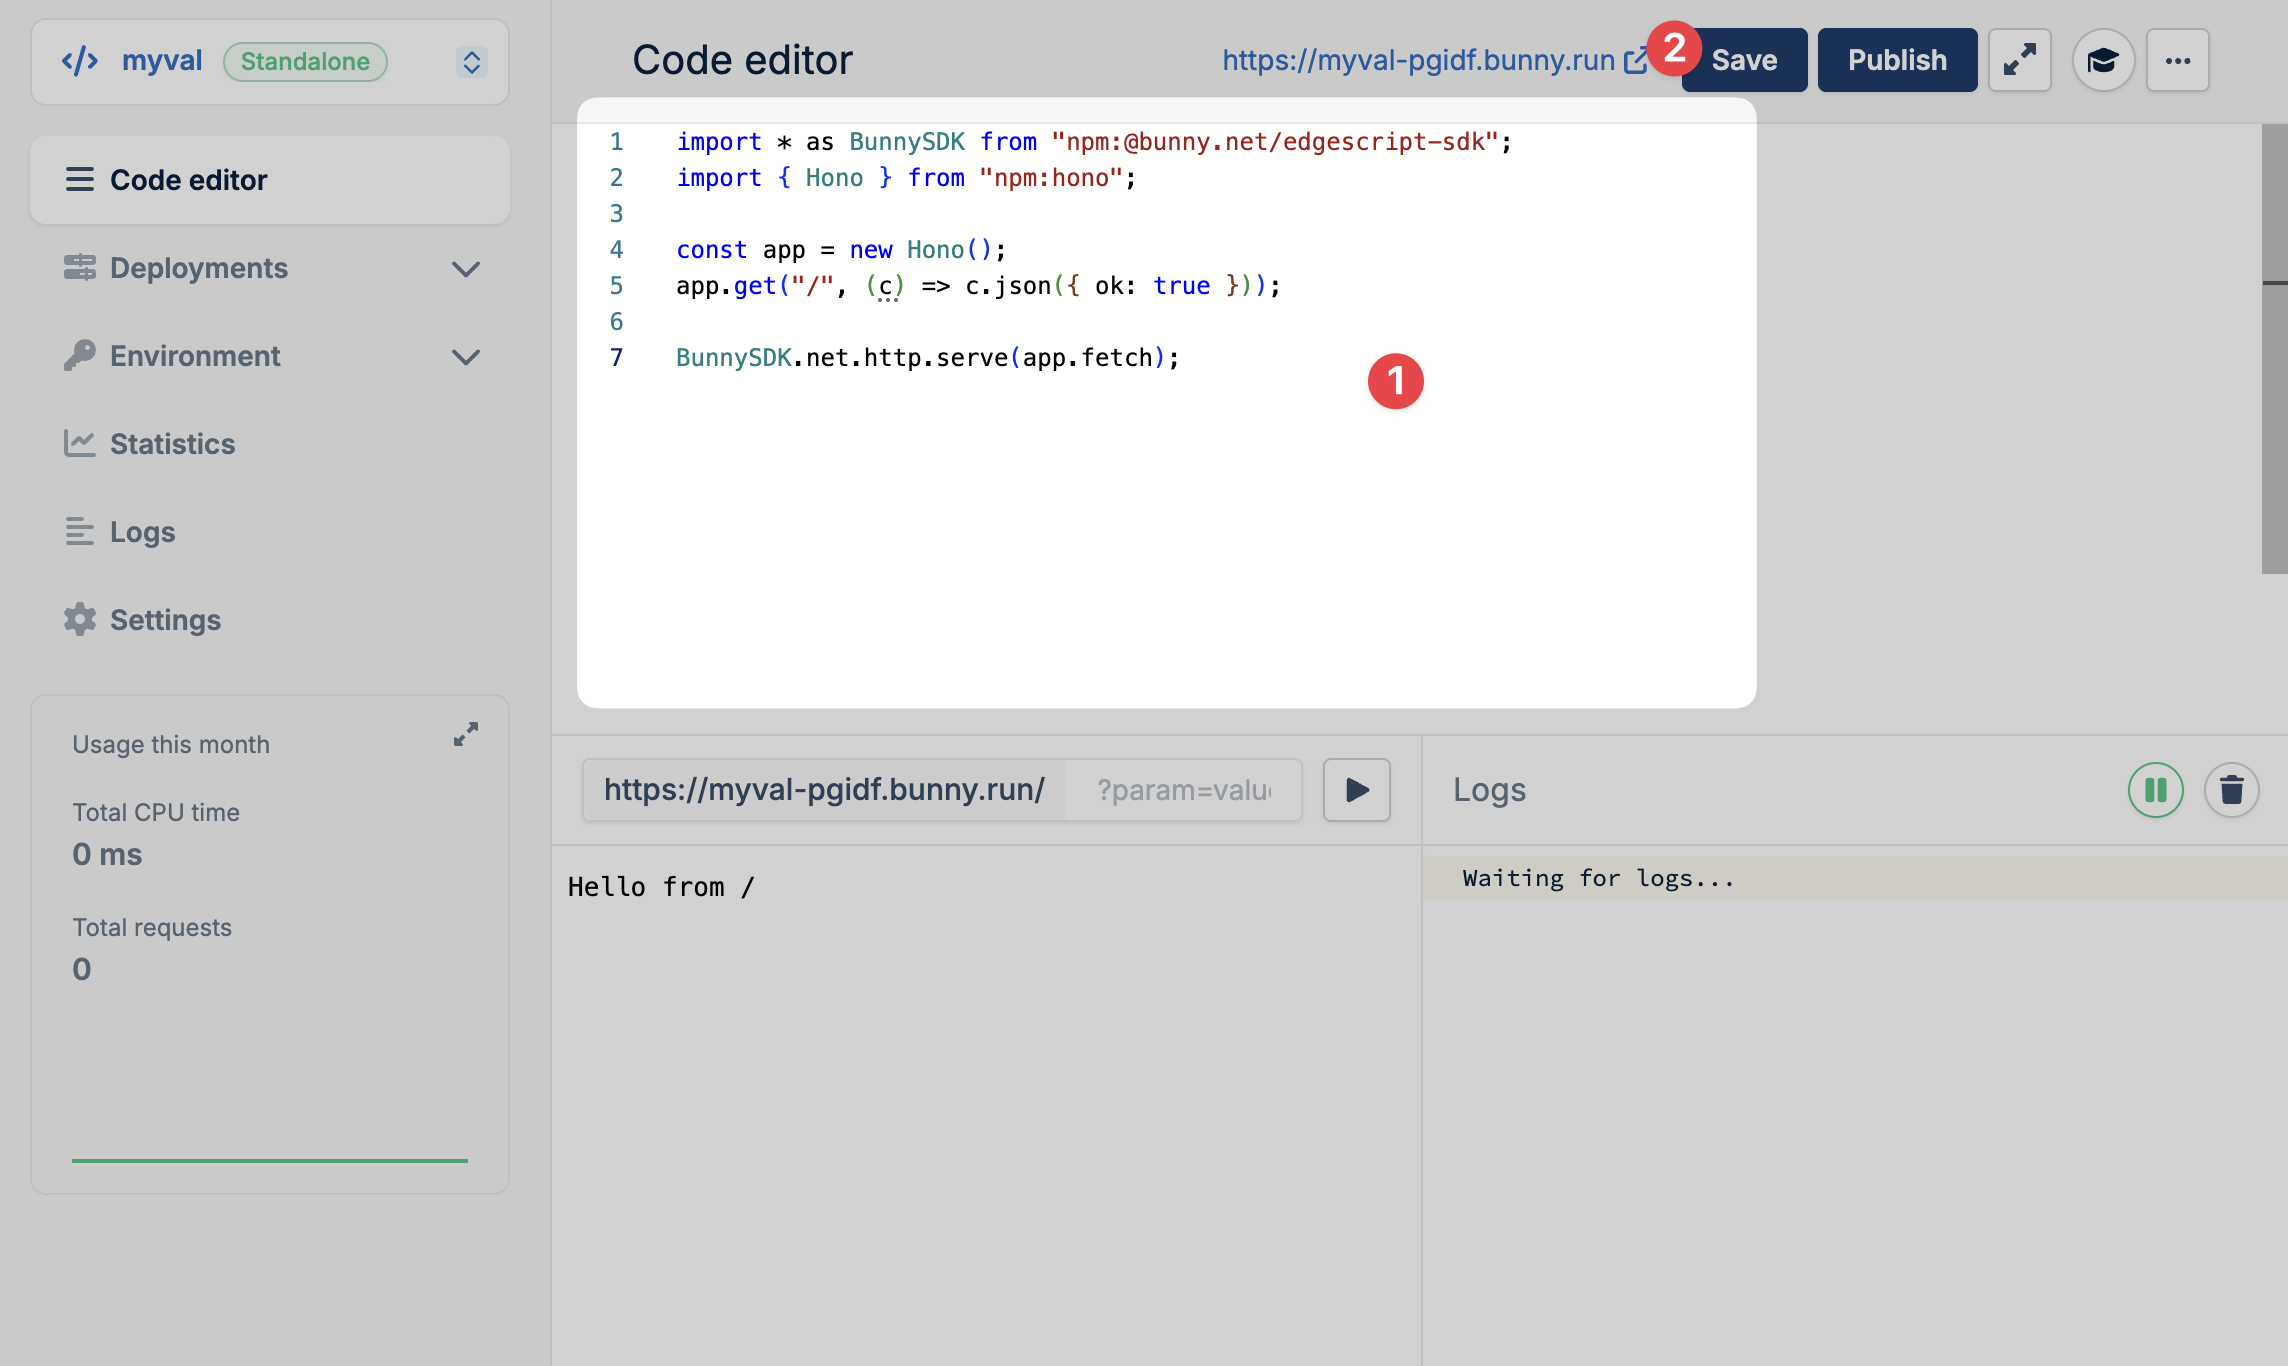
BunnySDK.net.http.serve(app.fetch);
The npm: prefix lets the script load packages with no build step, so the file you paste into the code editor is the file that runs. Imports from esm.town load from Val Town's servers, so swap each one for the npm or JSR package it wraps before January 10.
The database client
Val Town's sqlite object is an initialized @libsql/client instance, and Bunny Database's TypeScript docs use the same client. Swap the import for a client under the same name at the top of your script, and your execute() and batch() calls keep their arguments, placeholders, and the rows and columns result shape:
// Before
import { sqlite } from "https://esm.town/v/std/sqlite/main.ts";

// After
import { createClient } from "npm:@libsql/client/web";
import process from "node:process";

const sqlite = createClient({
  url: process.env.BUNNY_DATABASE_URL!,
  authToken: process.env.BUNNY_DATABASE_AUTH_TOKEN!,
});
The two environment variables don't exist yet. The database step adds them to your script for you.
Val Town blobs are values stored under a key. Bunny Storage stores files by path in a storage zone, so each blob key becomes a file path. This helper keeps your get, set, getJSON, setJSON, and delete call sites unchanged:
import * as BunnyStorageSDK from "npm:@bunny.net/storage-sdk";

const zone = BunnyStorageSDK.zone.connect_with_accesskey(
  BunnyStorageSDK.regions.StorageRegion.Falkenstein,
  process.env.BUNNY_STORAGE_ZONE!,
  process.env.BUNNY_STORAGE_PASSWORD!,
);

const blob = {
  async set(key: string, value: BodyInit) {
    const body = new Response(value).body!;
    await BunnyStorageSDK.file.upload(zone, `/${key}`, body);
  },

  async get(key: string) {
    const { stream } = await BunnyStorageSDK.file.download(zone, `/${key}`);
    return new Response(stream);
  },

  async setJSON(key: string, value: unknown) {
    const body = new Response(JSON.stringify(value)).body!;
    await BunnyStorageSDK.file.upload(zone, `/${key}`, body, {
      contentType: "application/json",
    });
  },

  async getJSON(key: string) {
    try {
      return await (await this.get(key)).json();
    } catch {
      // Val Town's getJSON returns undefined for a missing key
      return undefined;
    }
  },

  async delete(key: string) {
    await BunnyStorageSDK.file.remove(zone, `/${key}`);
  },
};
list is left out on purpose. Val Town lists every key under a prefix, and BunnyStorageSDK.file.list() returns the contents of one folder, so a val that walks its keys needs a small recursive version of its own. Change Falkenstein if you create your storage zone in another region.
Your main.ts now has the imports, the sqlite client, the blob helper, and your routes, ending with the serve() call.
Create the Edge Script
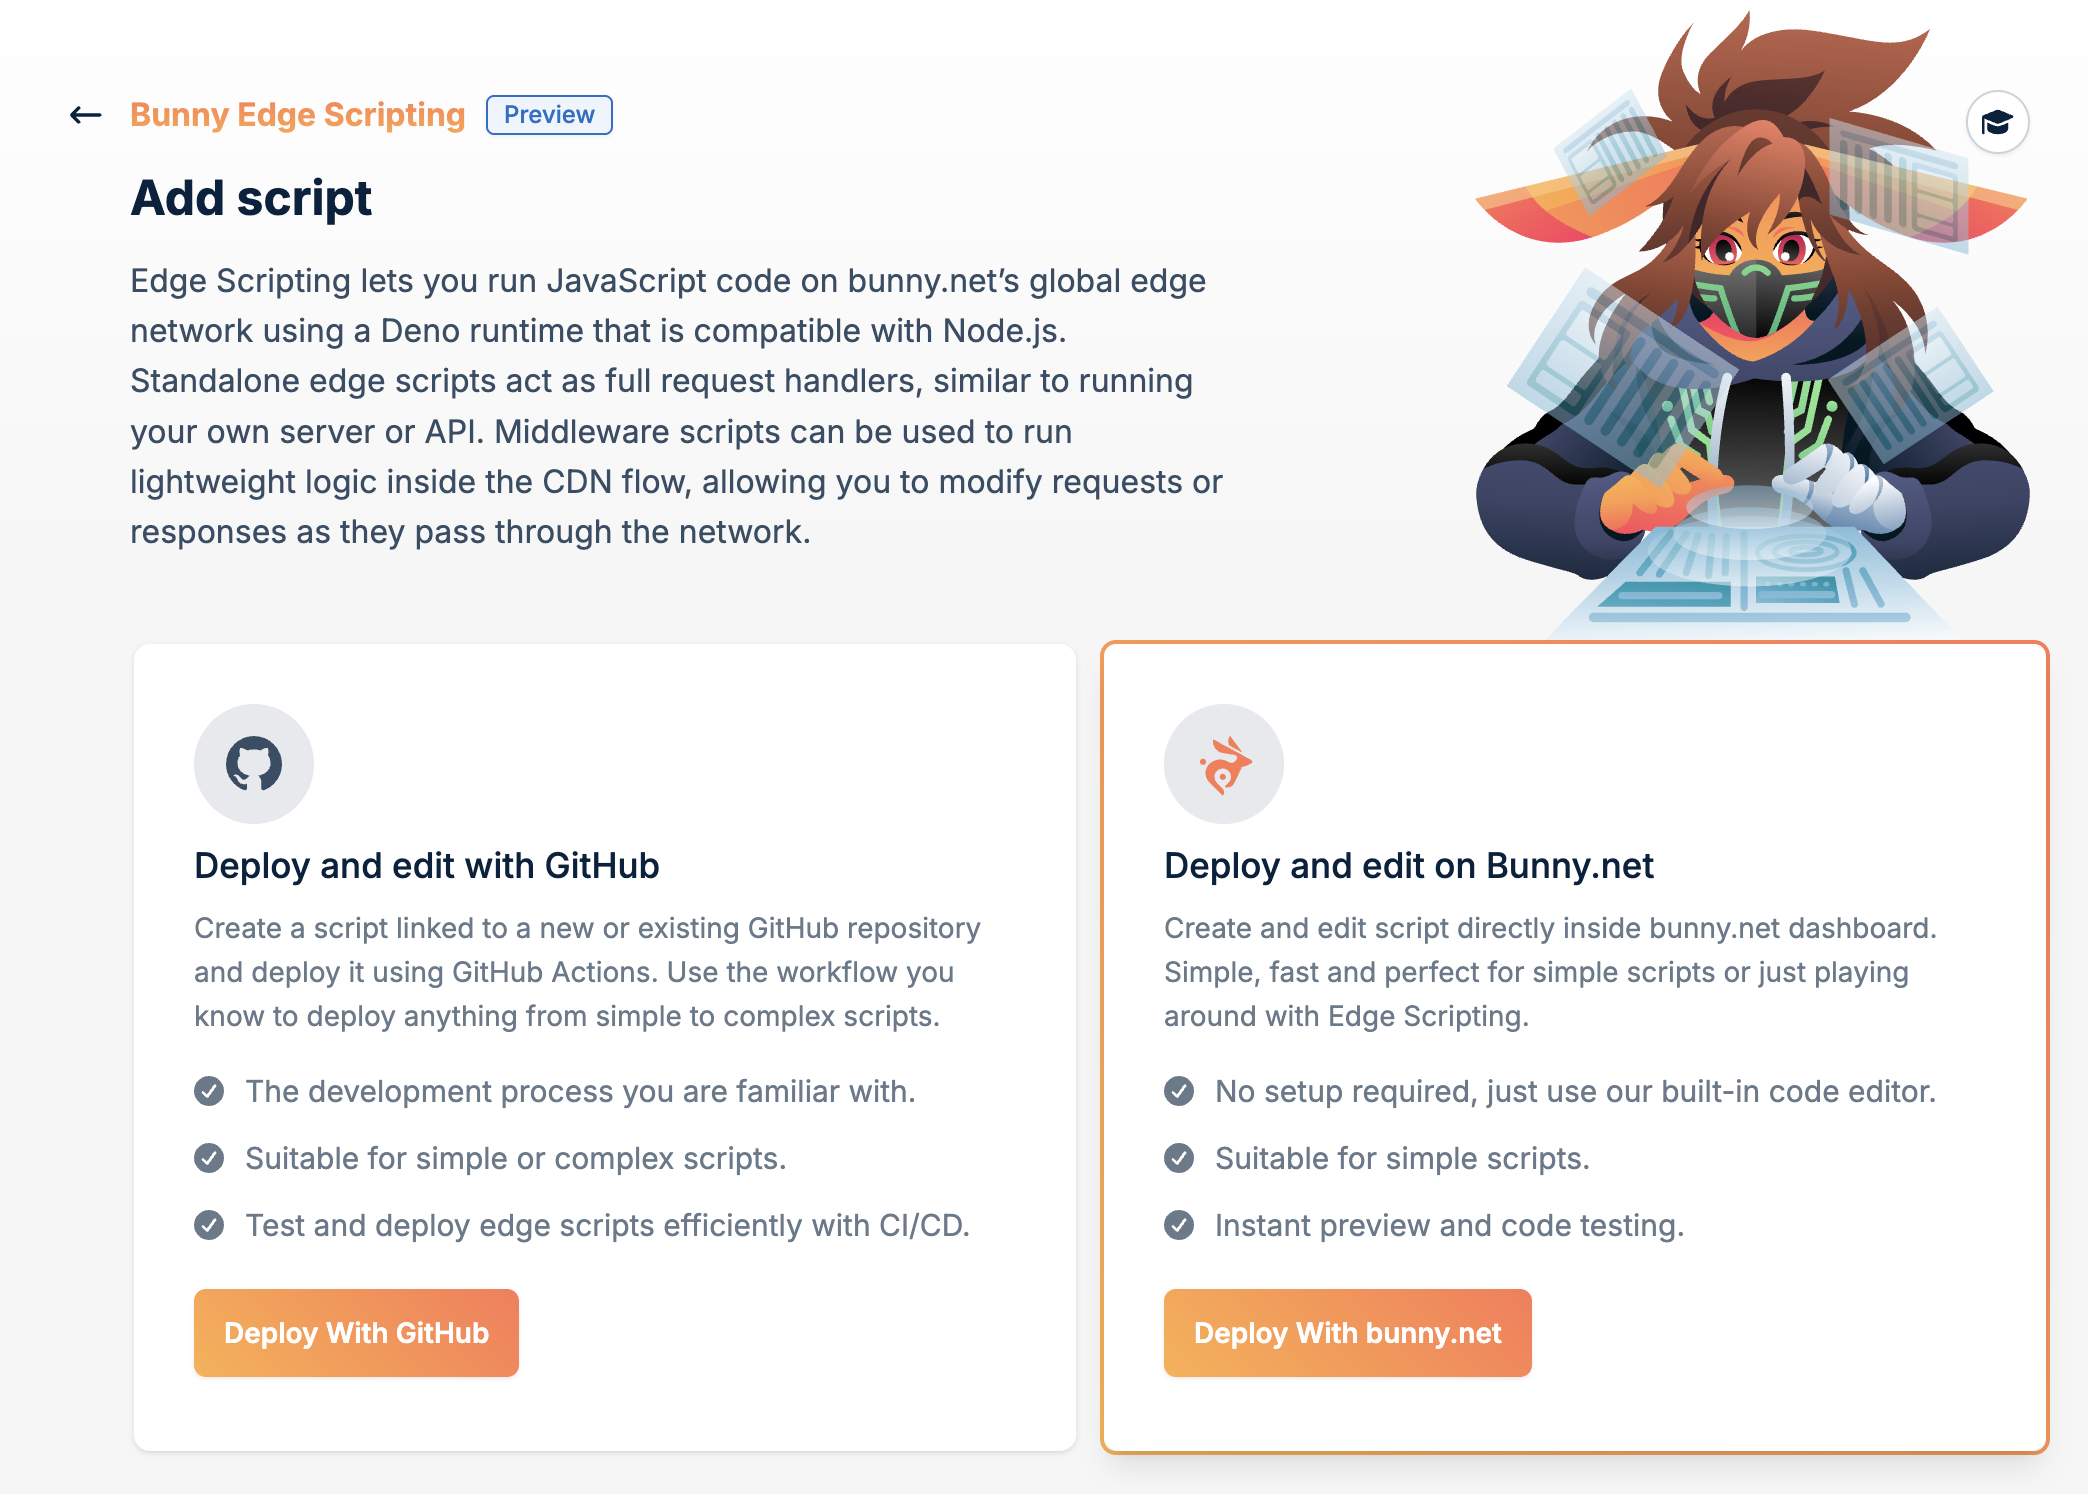
In the bunny.net dashboard, Add a New Edge Script. Make sure to select Deploy and edit on bunny.net:
Then give your script a name, select standalone for its type, and create a new database:
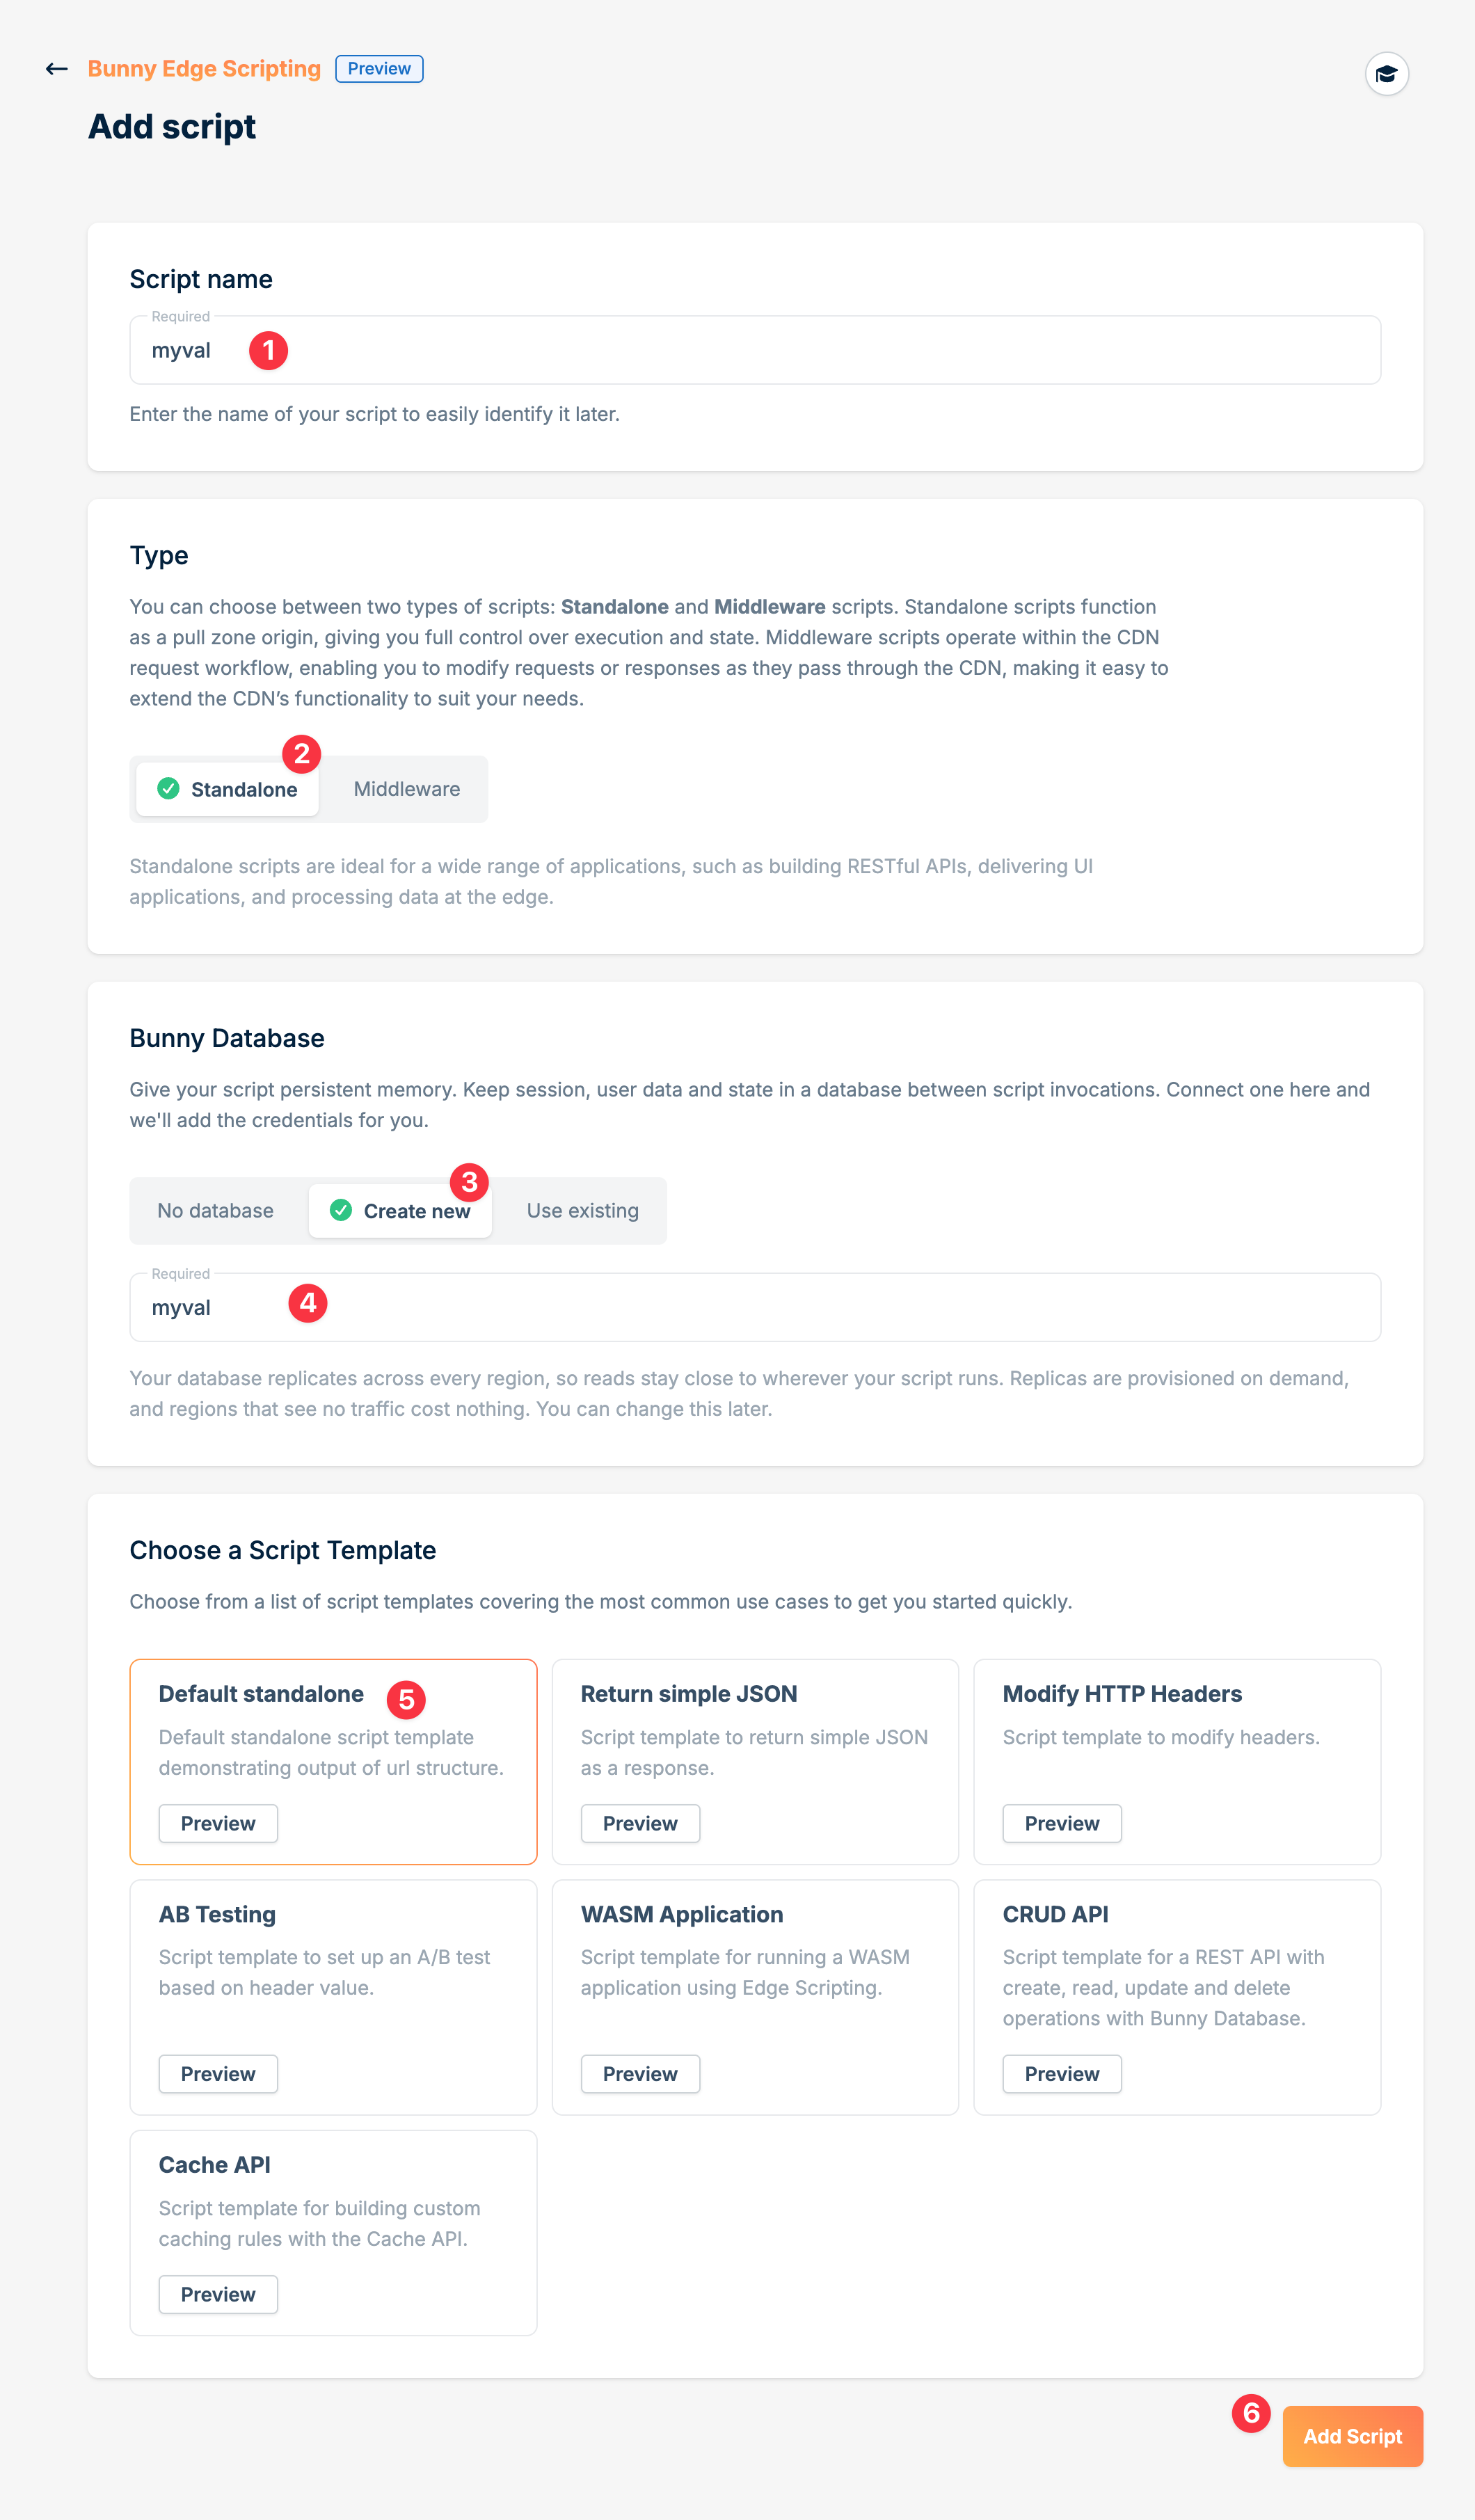
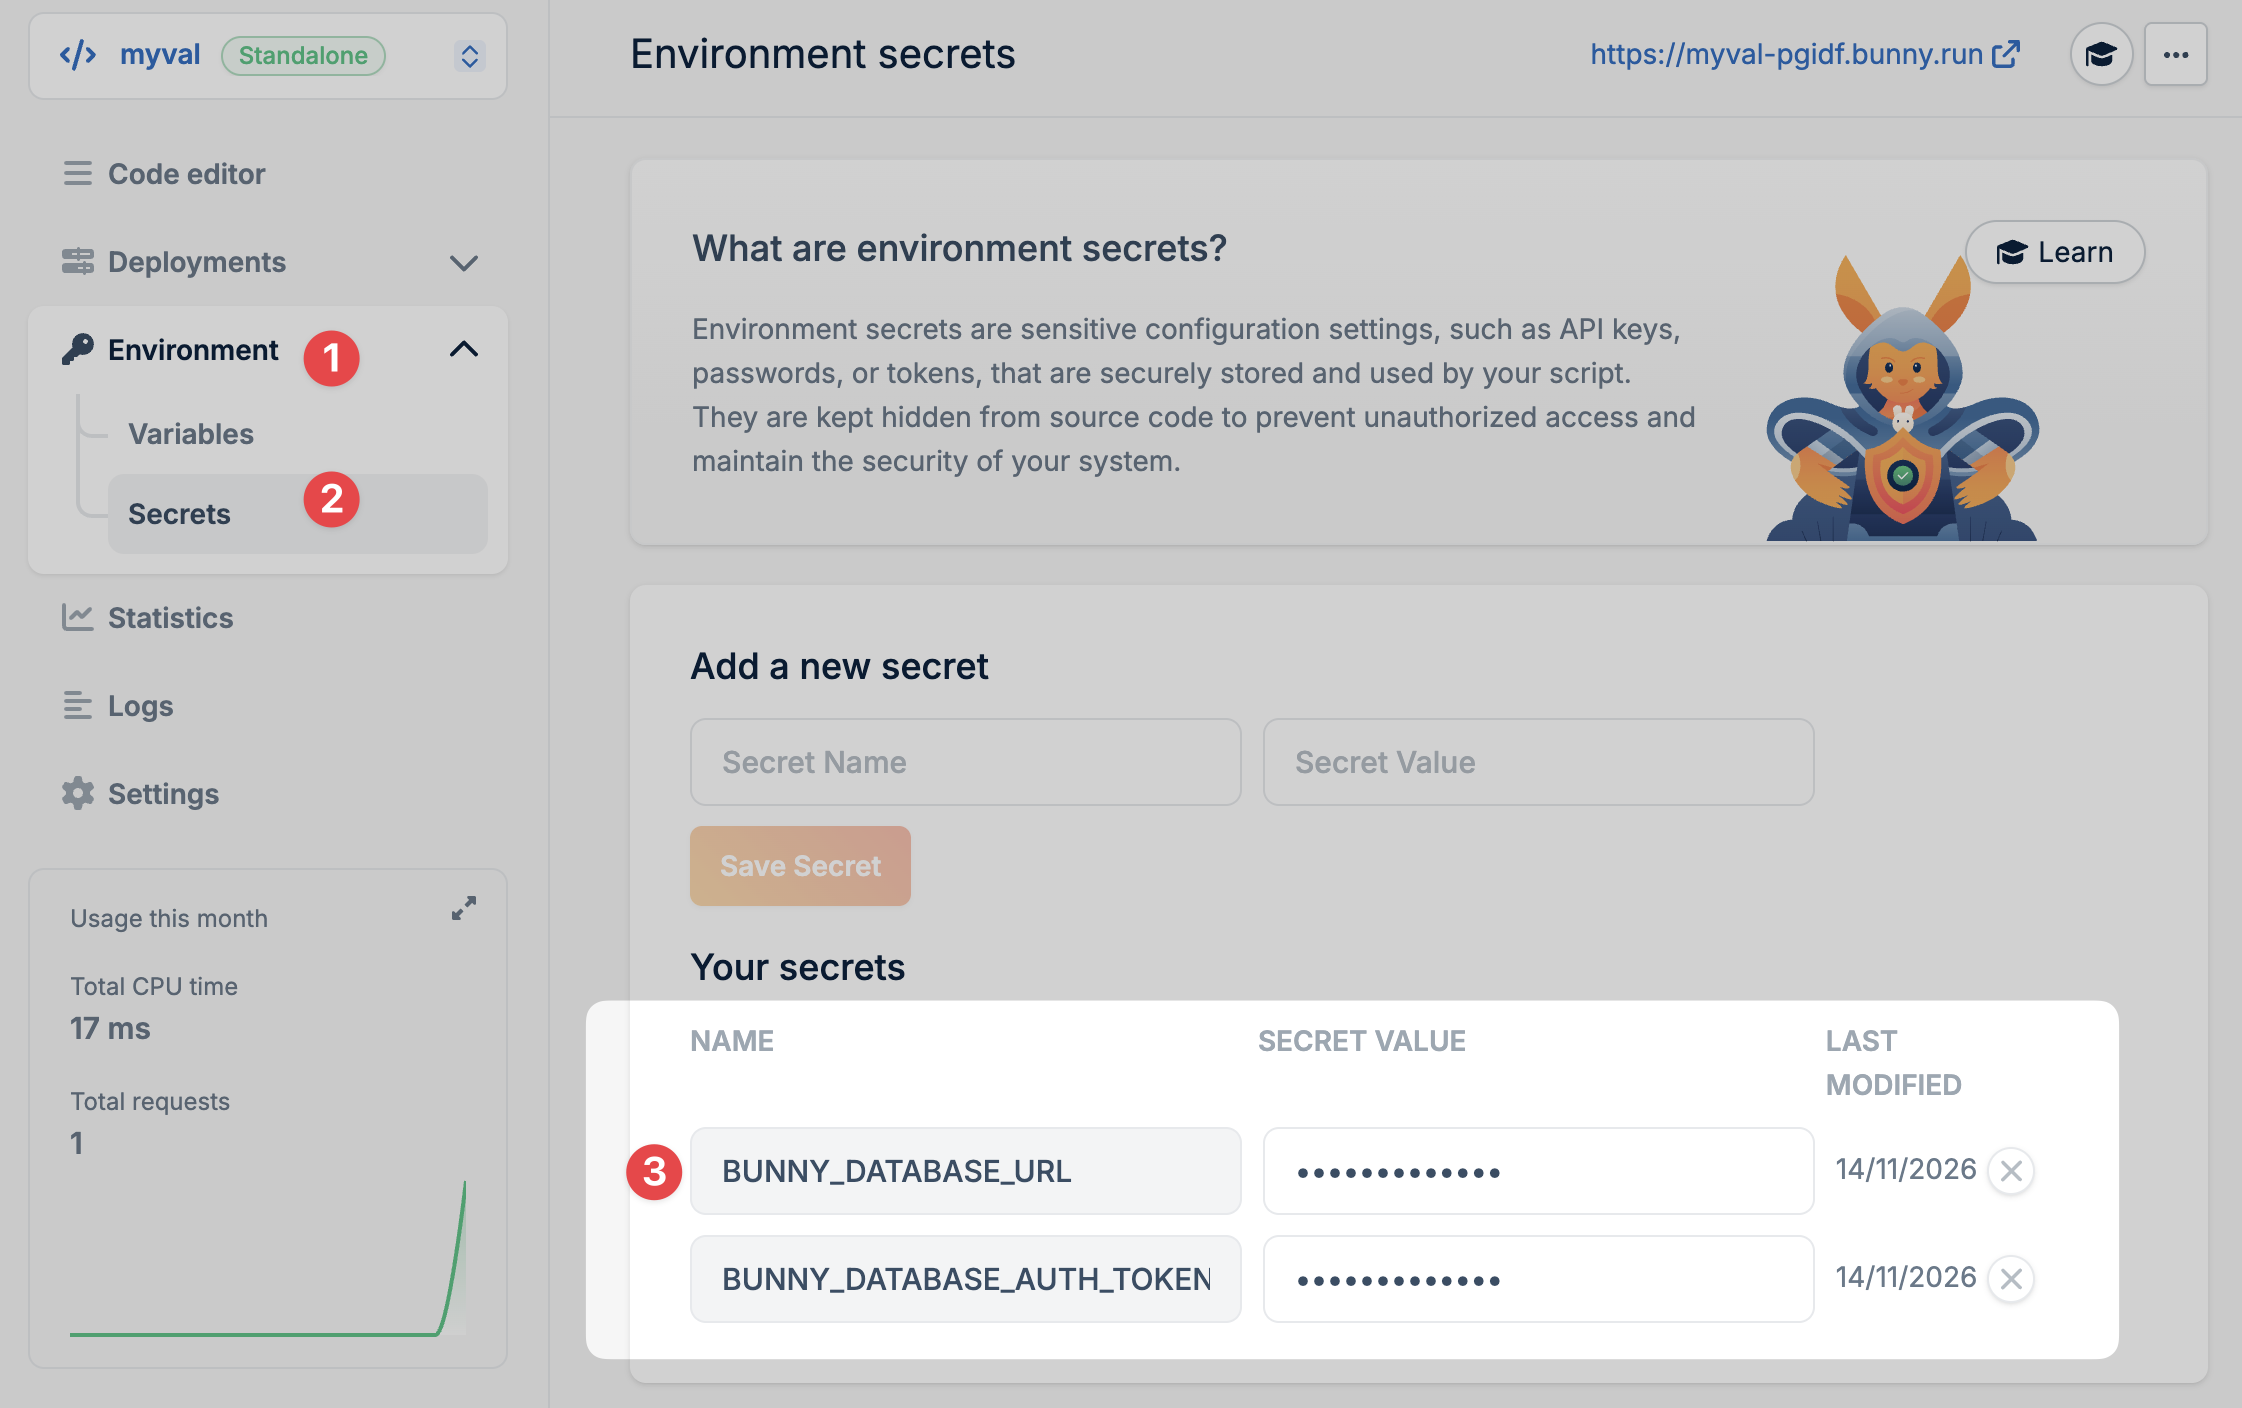
The dashboard creates an empty database and adds BUNNY_DATABASE_URL and BUNNY_DATABASE_AUTH_TOKEN to the script for you, which is what the sqlite client reads. If you already have a database, you can choose to use that existing one instead.
The database replicates across every region, so reads stay close to wherever the script runs, and replicas are provisioned on demand.
Once the script exists, paste your main.ts into its code editor and save it. Hold off on publishing until your data and blobs are in place.
Standalone scripts act as the origin for their pull zone. The CDN answers cached requests itself and calls your script on a cache miss. An API that must run on every request needs the Run script before cache option, which sits in the script settings.
Move the database
The database you created with the script starts empty, and that matters here. Val Town's dump uses CREATE TABLE IF NOT EXISTS, so a table that already exists with the same name keeps its old structure and the inserts land on top of it. If you chose Use existing, check it holds none of your val's tables yet.
Copy your data
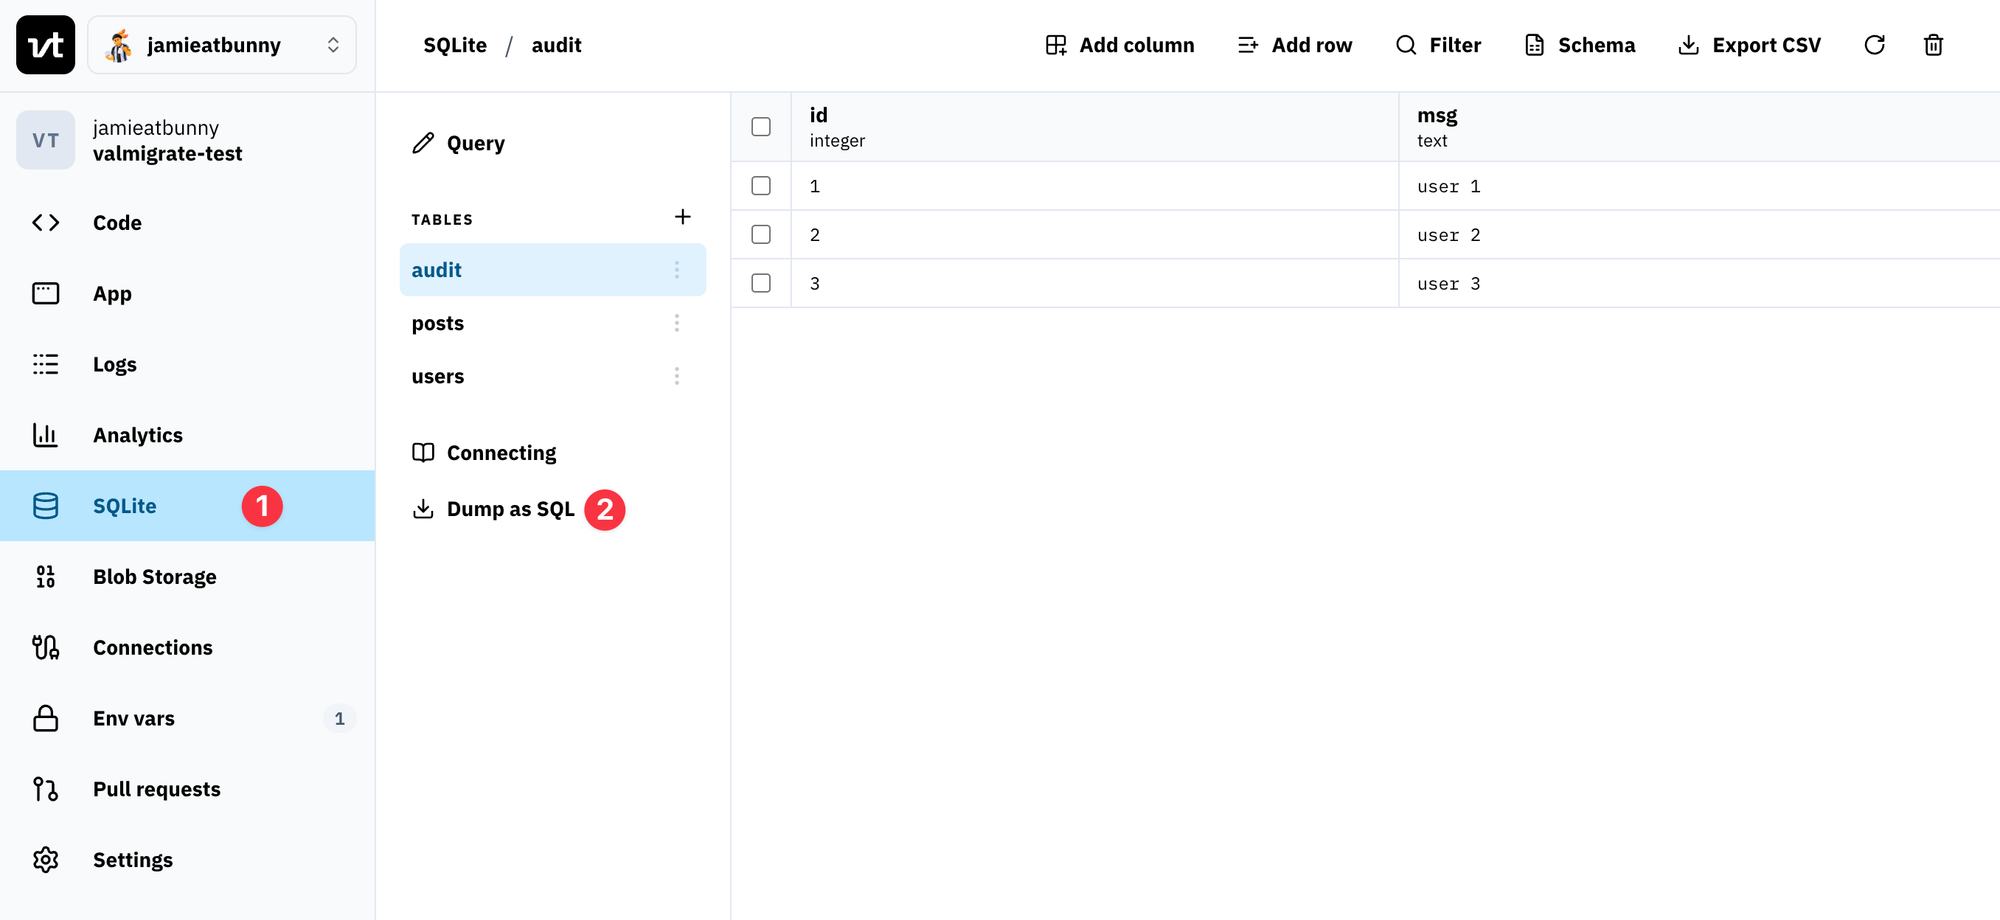
Open the val in Val Town and choose Dump as SQL. The dump carries your tables, rows, indexes, triggers, and autoincrement counters.
Copy the dump into the database's Database editor and delete the BEGIN TRANSACTION; and COMMIT; lines. Bunny Database runs the whole paste as one transaction and refuses a paste that opens its own. Then open the Run menu and choose Run All Statements:
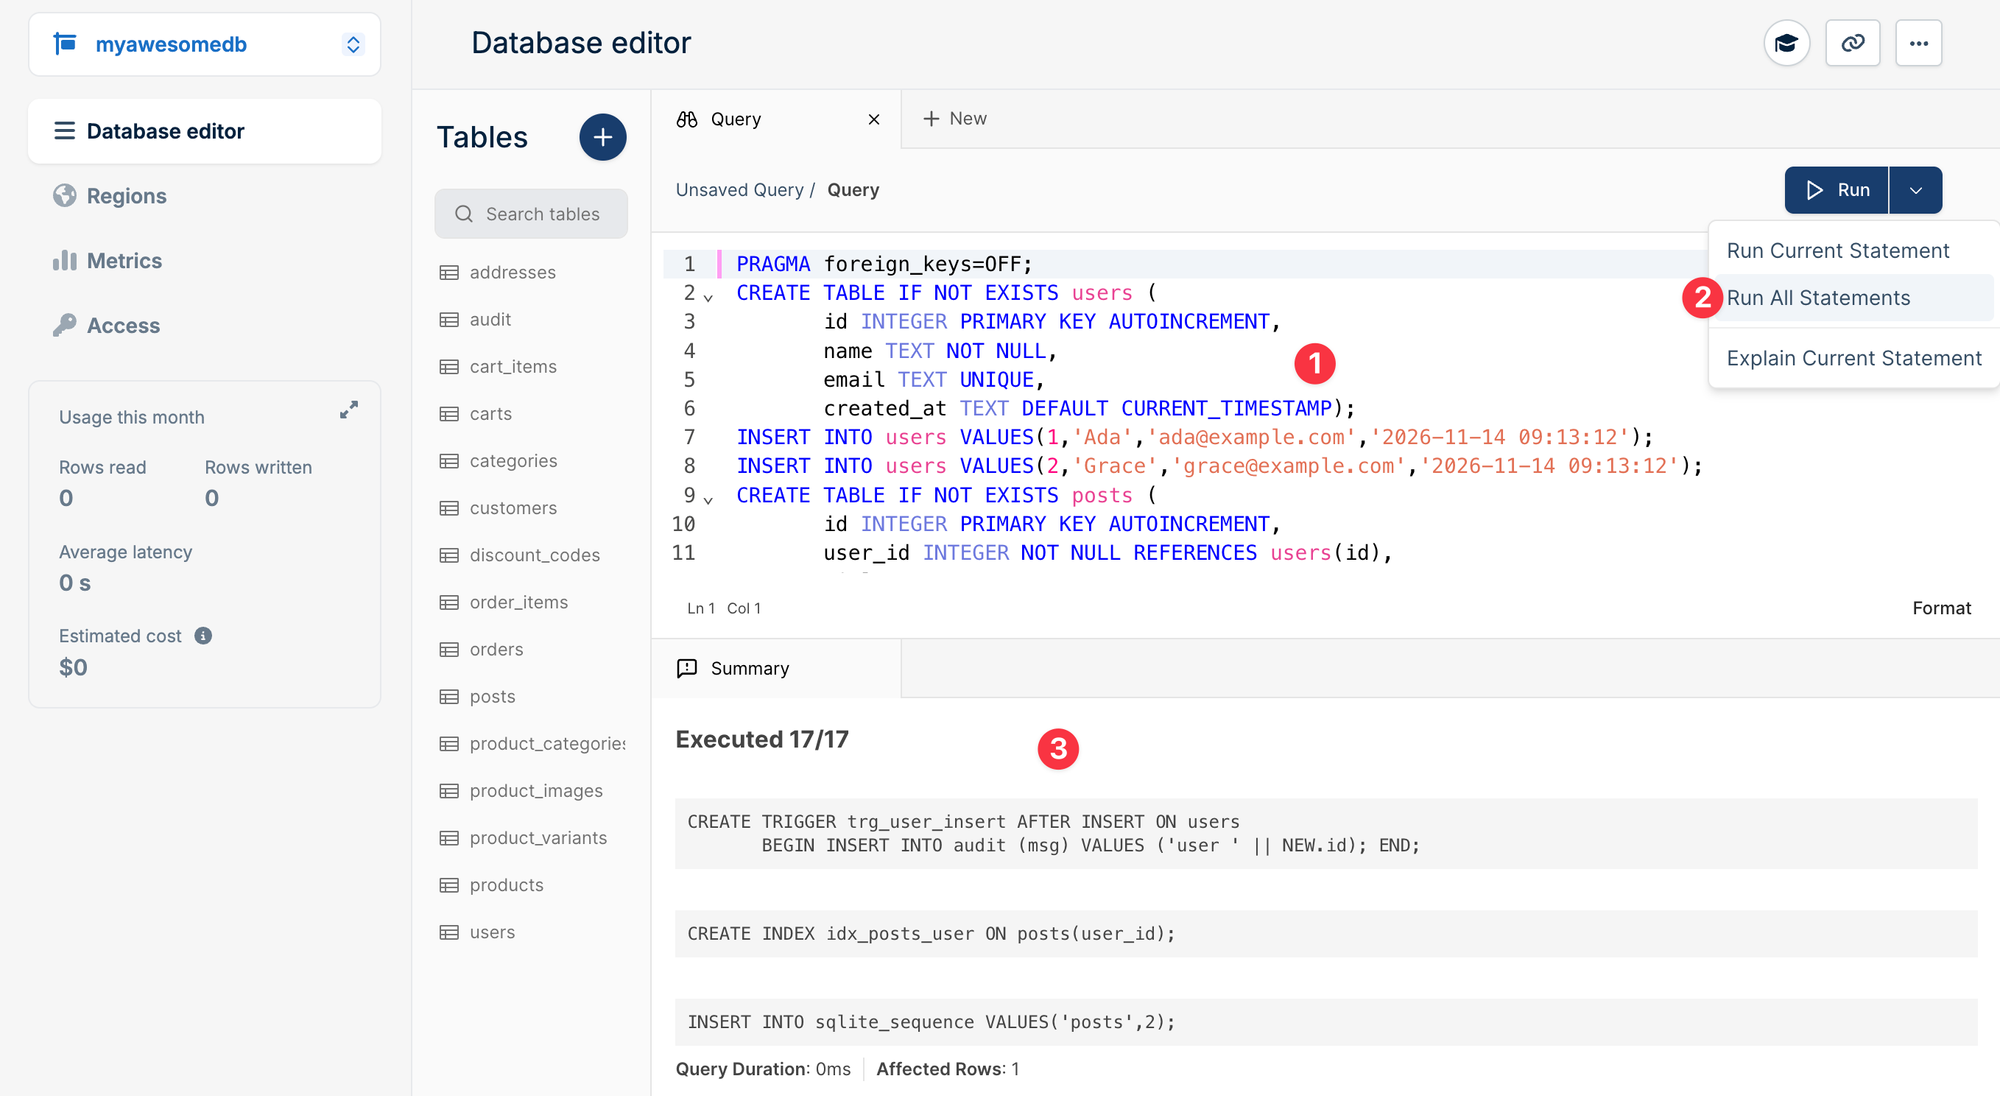
The tables appear in the sidebar once the run finishes. Check a few row counts against your val:
SELECT COUNT(*) FROM users;Rehearse on a throwaway database first, and pause writes on the val during the final copy so only one database accepts writes at a time. A very large dump can be awkward to paste into a browser, so the CLI section below shows how to import it from a file.
Bunny Database is in Public Preview, so features and APIs may still change.
Move the blobs
Create the storage zone with S3 switched on
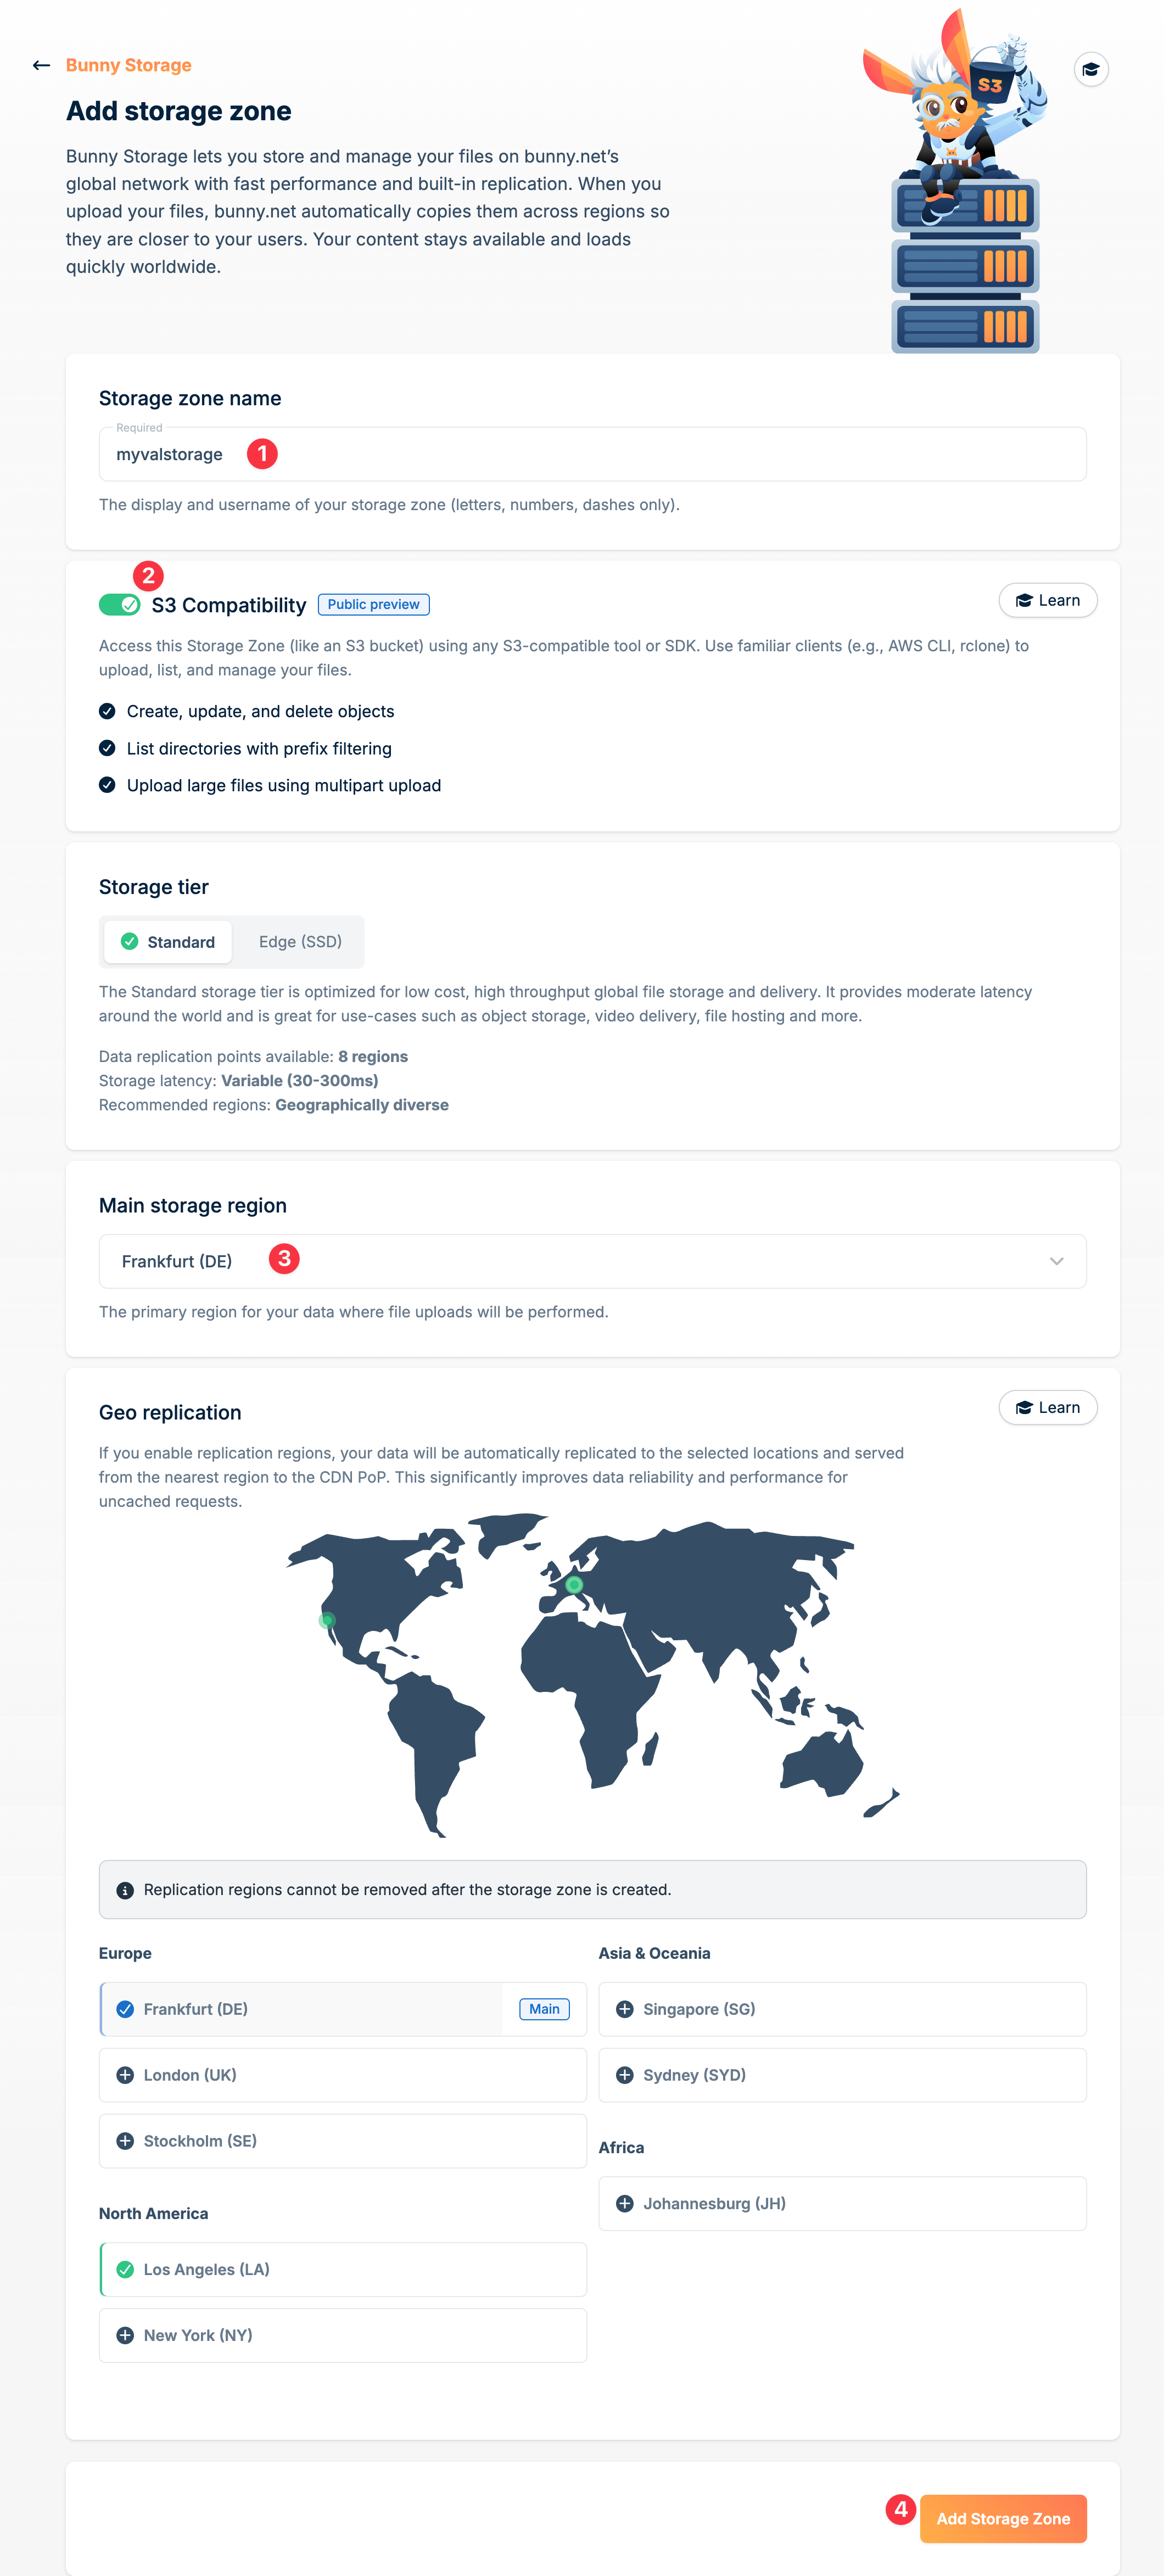
Create a storage zone in the dashboard under Storage, and switch on S3 compatibility in the same form. S3 access can only be enabled when the zone is created, and the copy step below uses it. Pick Falkenstein (DE) as the main region to match the helper, or change StorageRegion.Falkenstein to the region you choose.
Open the zone's FTP & API Access tab and copy its password.
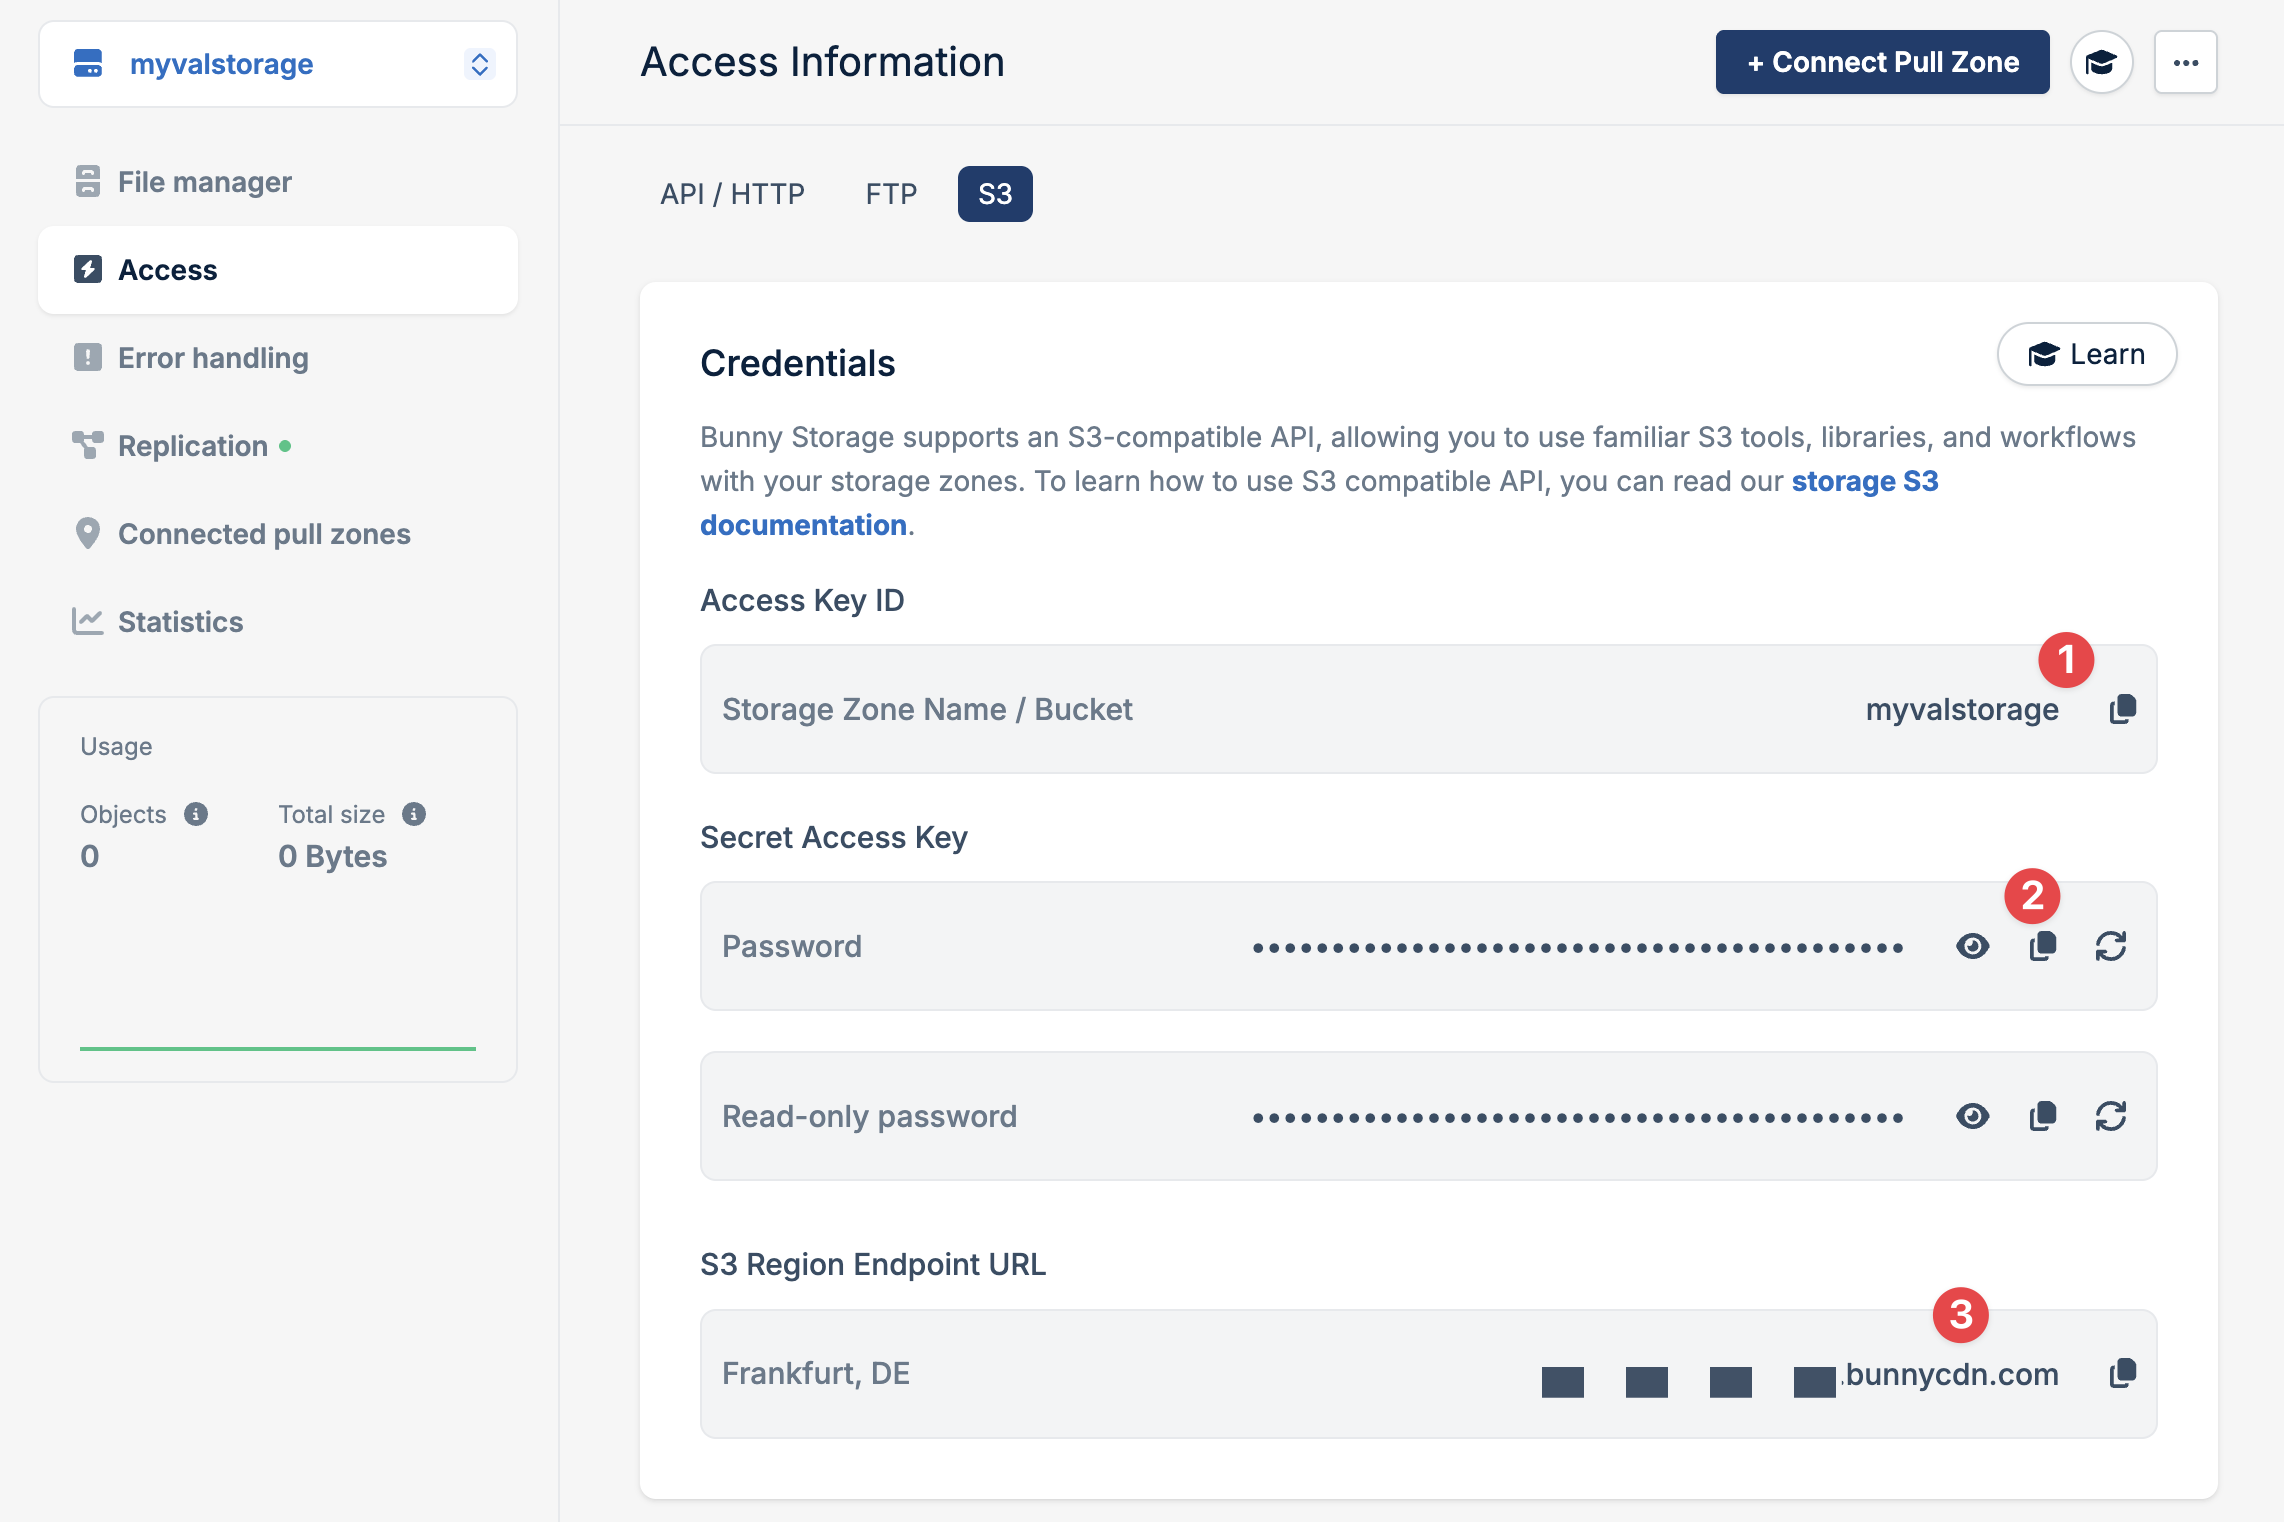
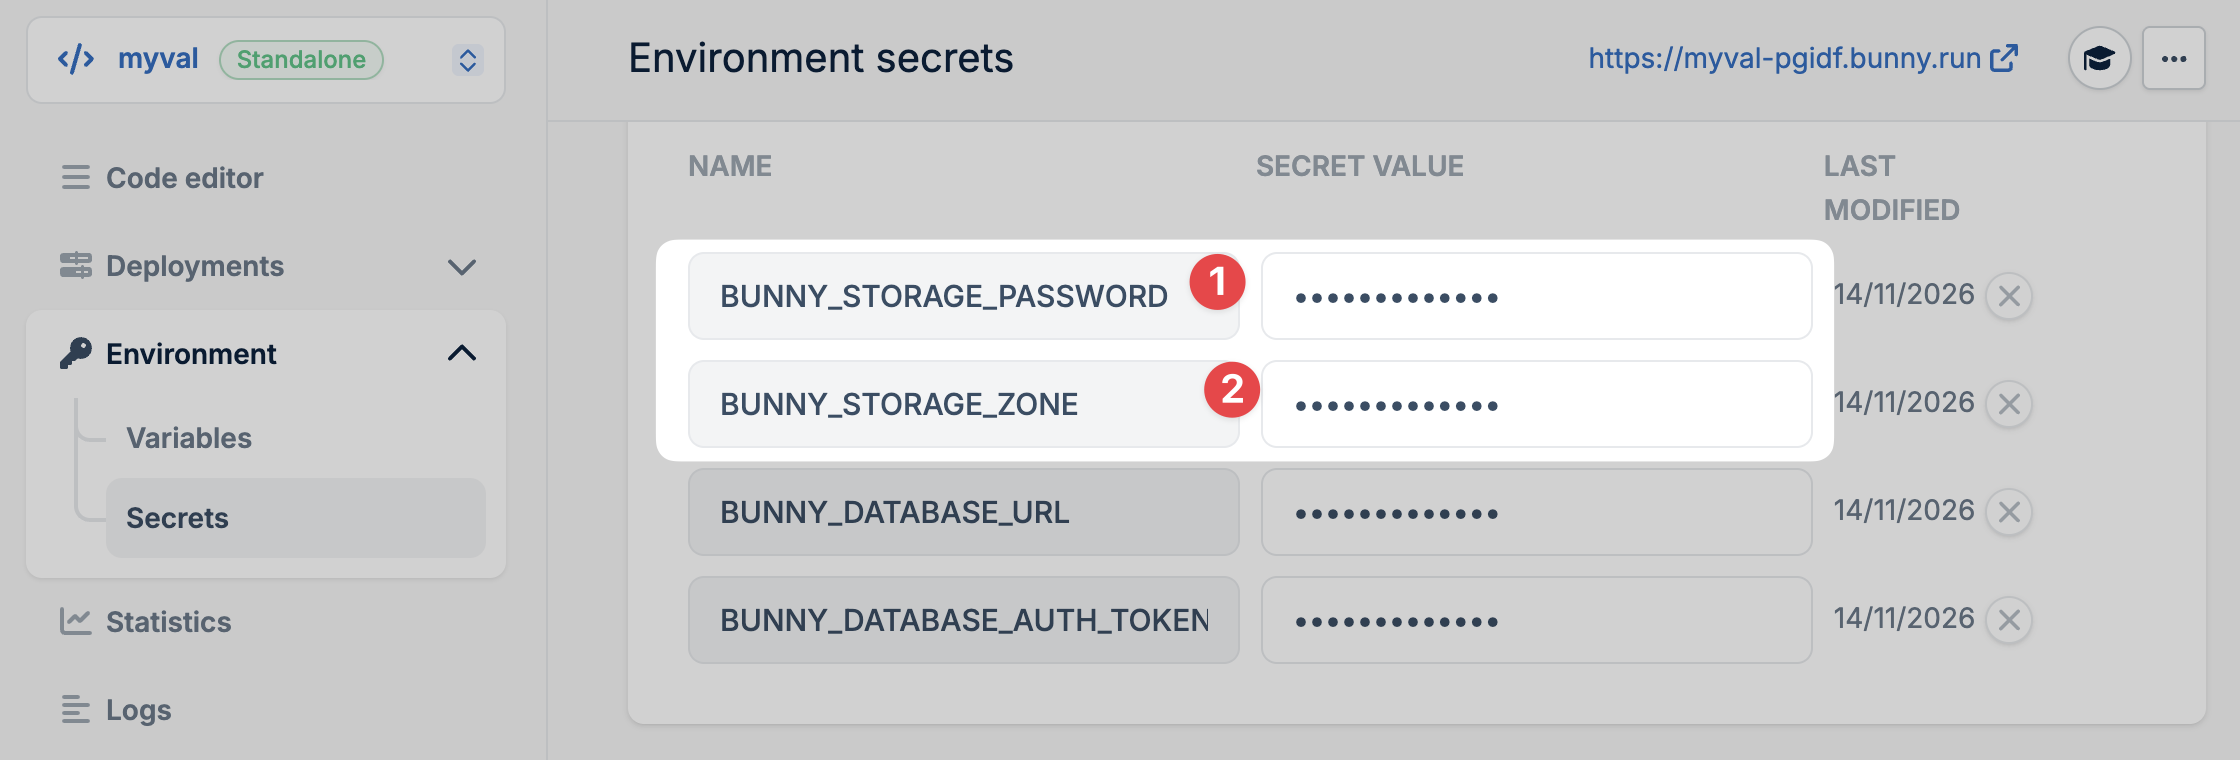
In your script's Environment page, add BUNNY_STORAGE_ZONE with the zone's name and BUNNY_STORAGE_PASSWORD as a secret with the password.
Download your blobs from Val Town
Existing blobs need copying while Val Town still serves them. Both scripts below write every blob into a local ./blobs folder, which also doubles as a backup.
New vals import std/blob/main.ts, which keeps blobs scoped to the val. Your account API token can't see those, so vt.blobs.list() from the Val Town SDK comes back empty. The val itself can read them, so add a temporary HTTP file to the val that lists the keys and returns one blob at a time:
// blob-export.ts (delete it once the copy is verified)
import { blob } from "https://esm.town/v/std/blob/main.ts";

export default async function (req: Request): Promise<Response> {
  const token = Deno.env.get("BLOB_EXPORT_TOKEN");
  if (!token || req.headers.get("authorization") !== `Bearer ${token}`) {
    return new Response("Unauthorized", { status: 401 });
  }

  const key = new URL(req.url).searchParams.get("key");
  if (!key) return Response.json(await blob.list());

  return new Response((await blob.get(key)).body, {
    headers: { "cache-control": "no-store" },
  });
}
Set BLOB_EXPORT_TOKEN to a long random string in the val's environment variables, then pull everything down with Node:
// download-blobs.mjs
import { mkdir, writeFile } from "node:fs/promises";
import { dirname, join } from "node:path";

const url = process.env.BLOB_EXPORT_URL;
const headers = { Authorization: `Bearer ${process.env.BLOB_EXPORT_TOKEN}` };

for (const { key } of await (await fetch(url, { headers })).json()) {
  const res = await fetch(`${url}?key=${encodeURIComponent(key)}`, { headers });
  if (!res.ok) throw new Error(`${key}: ${res.status}`);

  const path = join("blobs", key);
  await mkdir(dirname(path), { recursive: true });
  await writeFile(path, Buffer.from(await res.arrayBuffer()));
  console.log(key);
}
BLOB_EXPORT_URL=https://your-blob-export.web.val.run \
BLOB_EXPORT_TOKEN=your-token \
node download-blobs.mjsOlder vals that import std/blob without main.ts use account-wide storage, which your API token can read directly. Create a token in your Val Town settings, export it as VAL_TOWN_API_KEY, and run this version instead:
// download-global-blobs.mjs
import ValTown from "@valtown/sdk";
import { mkdir, writeFile } from "node:fs/promises";
import { dirname, join } from "node:path";

const vt = new ValTown(); // reads VAL_TOWN_API_KEY

for (const { key } of await vt.blobs.list()) {
  const res = await vt.blobs.get(key);

  const path = join("blobs", key);
  await mkdir(dirname(path), { recursive: true });
  await writeFile(path, Buffer.from(await res.arrayBuffer()));
  console.log(key);
}
npm install @valtown/sdk
node download-global-blobs.mjsCopy them into Bunny Storage
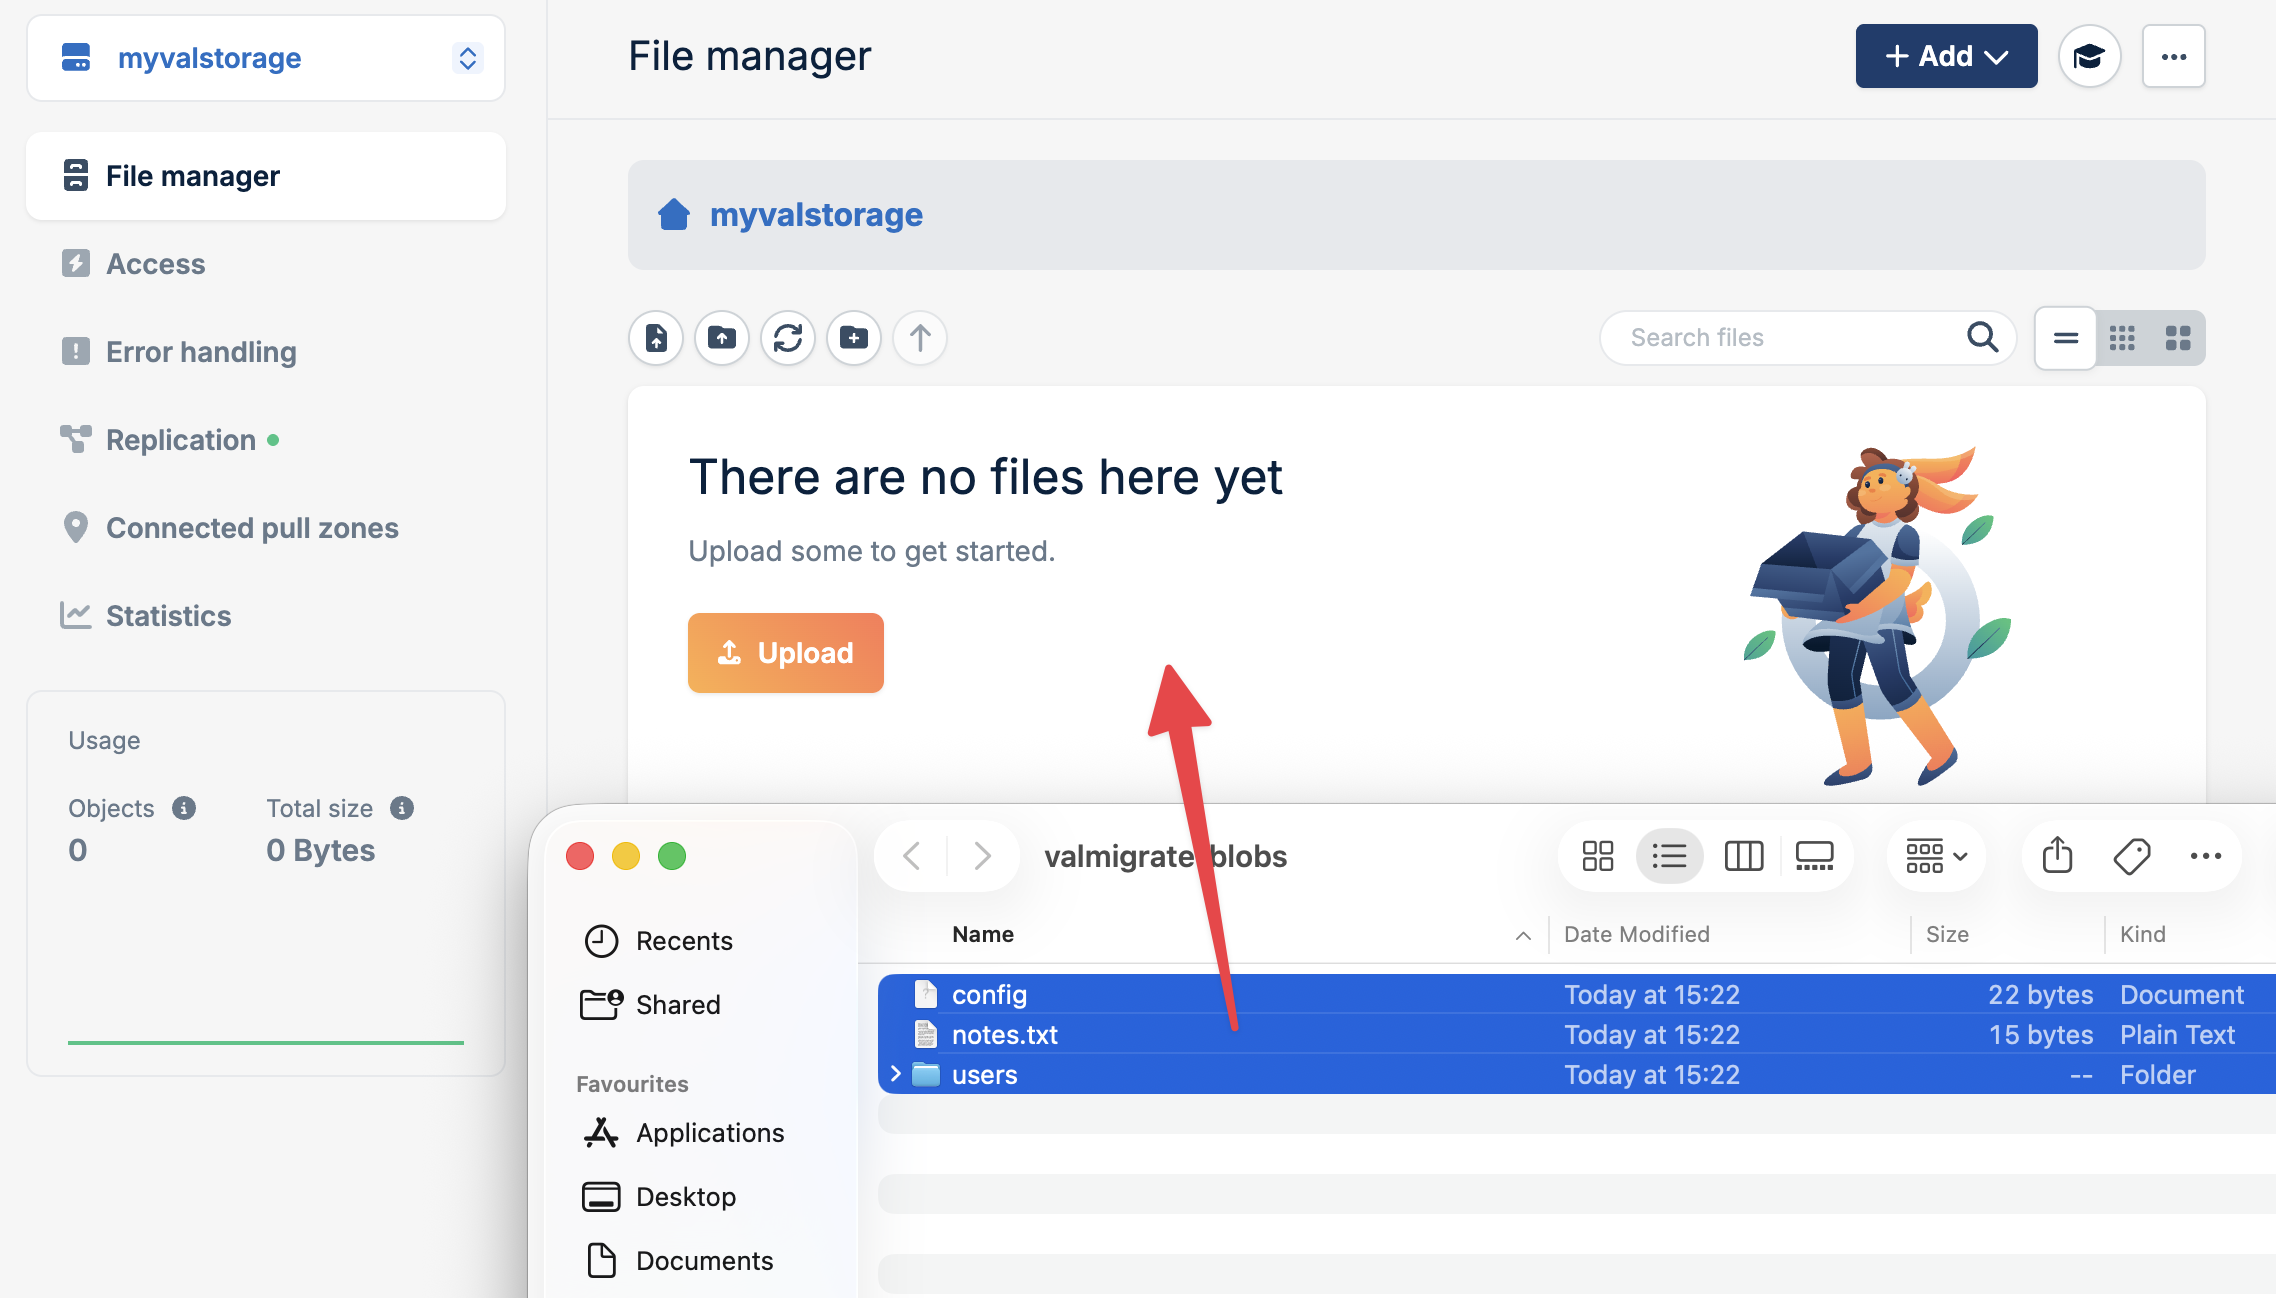
Open the storage zone's File manager in the dashboard. Then open your local blobs folder, select everything inside it, and drag the selection onto the file manager.
Drag the contents. Each blob key has to sit at the root of the zone, so config lands at /config, which is the path blob.get("config") asks for:
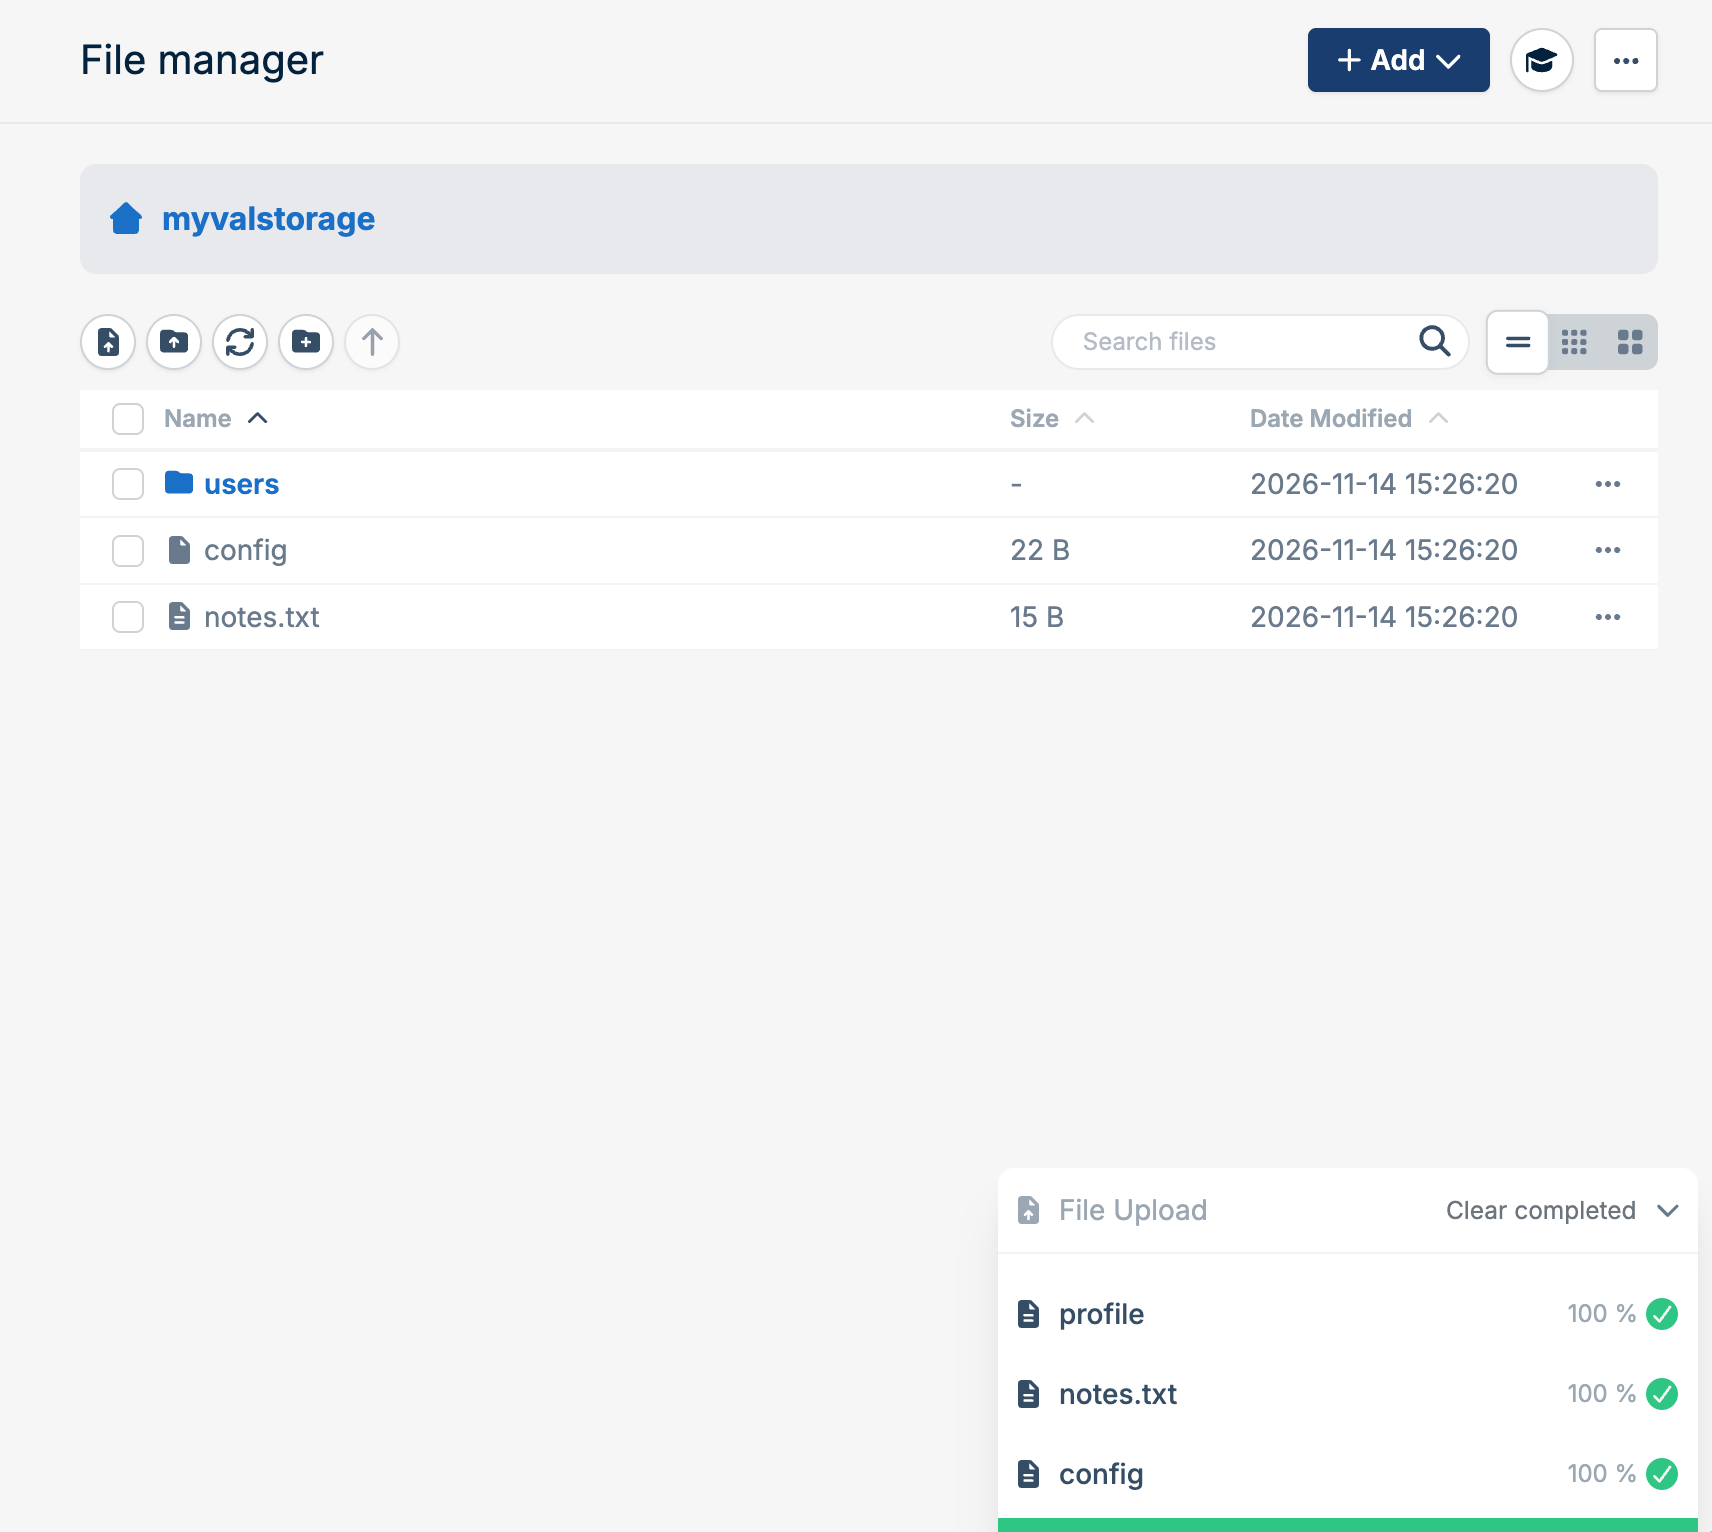
The upload keeps nested keys as folders, so users/1/profile arrives as a users folder holding 1/profile.
For a val with thousands of blobs, rclone copies the whole folder in one command through the zone's S3 API. The endpoint uses your zone's region code in lowercase, so a zone in Falkenstein (DE) uses https://de-s3.storage.bunnycdn.com:
rclone config create bunny s3 \
  provider=Other \
  access_key_id=my-zone \
  secret_access_key=your-storage-password \
  endpoint=https://de-s3.storage.bunnycdn.com

rclone copy ./blobs bunny:my-zone
rclone ls bunny:my-zone
The access key is the zone's name and the secret is the zone password you copied earlier. rclone copy ./blobs copies what's inside the folder, so the keys land at the root here too.
Publish and switch over
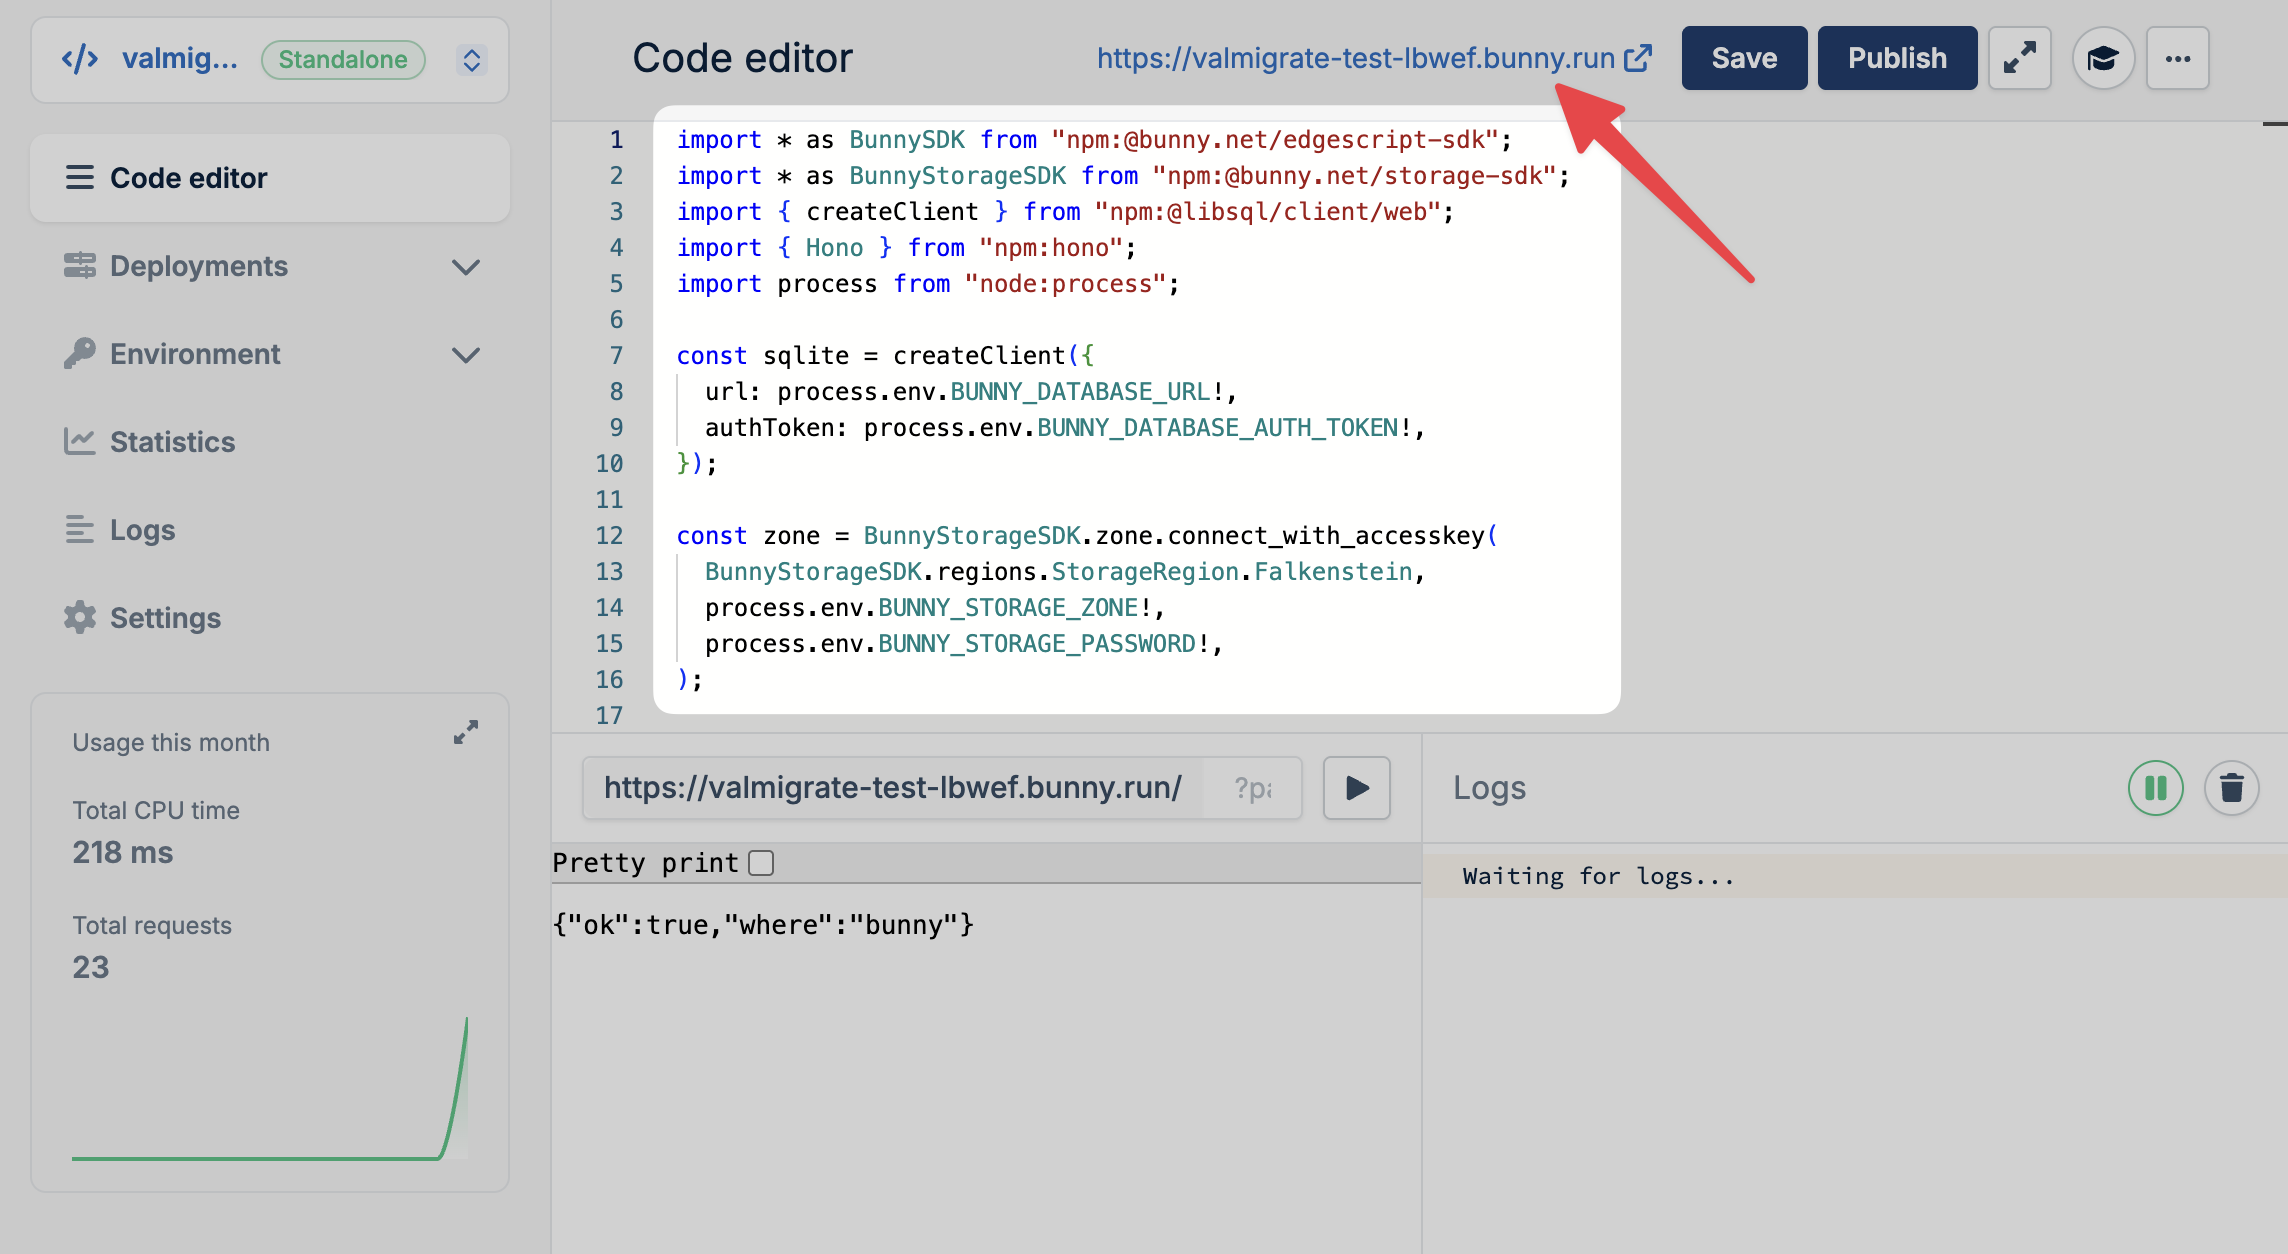
Add an environment variable or secret for any other value the val read with Deno.env.get(), then click Publish in the code editor. Watch the live logs while you send a few test requests, and compare each response with the same route on your val.run URL.
A val that has grown into a proper project fits better in a GitHub repository, where each push deploys through GitHub Actions. The repository becomes the place you edit the code from then on.
Val Town's docs also cover redirecting val.run URLs, which saves updating every webhook and bookmark by hand. Steve personally committed to the URL redirects for 10 years, which is great peace of mind for those migrating who have URLs out there that others rely on <3
Prefer the terminal?
The bunny.net CLI runs the same migration from a folder holding your main.ts, the Val Town dump.sql, and the ./blobs folder. Install it and sign in first:
npm install -g @bunny.net/cli
bunny login
Create the script, then the database. --save-env writes the database credentials to a local .env file, and the import reads the dump from a file, so large databases are fine here:
bunny scripts create my-val --type standalone
bunny db create --name my-val --link --token --save-env

grep -v '^BEGIN TRANSACTION;$\|^COMMIT;$' dump.sql > app.sql
bunny db shell app.sql
bunny db shell -e "SELECT COUNT(*) FROM users"
The .env file stays on your machine, so hand the two values to the script as secrets:
source .env
bunny scripts env set BUNNY_DATABASE_URL "$BUNNY_DATABASE_URL" --secret
bunny scripts env set BUNNY_DATABASE_AUTH_TOKEN "$BUNNY_DATABASE_AUTH_TOKEN" --secret
Create the storage zone with S3 switched on, and let the CLI write the rclone remote for you. The remote is named after the zone:
bunny storage zones create my-zone --region DE --s3
bunny storage zones credentials my-zone --format rclone >> ~/.config/rclone/rclone.conf
rclone copy ./blobs my-zone:my-zone
Run bunny storage zones credentials my-zone --show-secret to see the zone's password, then give the script its storage settings and deploy:
bunny scripts env set BUNNY_STORAGE_ZONE my-zone
bunny scripts env set BUNNY_STORAGE_PASSWORD your-storage-password --secret
bunny scripts deploy main.ts
The CLI uploads main.ts as it stands, so the dashboard's code editor shows the same file and you can keep editing it there.
Hand the port to your coding agent
Working through the steps by hand is a good way to learn each bunny.net product. You can also hand the whole job to Claude Code, Cursor, or Codex. Copy your val's files into a folder, save the Dump as SQL output next to them as dump.sql, and give the agent the bunny.net CLI skill so it knows the commands:
bunny login
bunny skills install
Then paste this prompt:
Port the Val Town val in this folder to bunny.net. Follow these rules exactly.

Code
- Produce one standalone Edge Script file, main.ts, with no build step.
- Import every package with an npm: specifier, e.g. "npm:hono",
  "npm:@bunny.net/edgescript-sdk". Bare package names fail without a bundler.
- Replace `export default handler` with BunnySDK.net.http.serve(handler).
  For Hono, pass app.fetch.
- Replace Deno.env.get("X") with process.env.X, importing process from
  "node:process".
- Replace std/sqlite with a libSQL client named `sqlite`, so call sites stay
  the same:
    import { createClient } from "npm:@libsql/client/web";
    const sqlite = createClient({
      url: process.env.BUNNY_DATABASE_URL!,
      authToken: process.env.BUNNY_DATABASE_AUTH_TOKEN!,
    });
- Replace std/blob with a `blob` object built on "npm:@bunny.net/storage-sdk",
  connecting with BUNNY_STORAGE_ZONE and BUNNY_STORAGE_PASSWORD. Implement
  only the methods the val uses (get, set, getJSON, setJSON, delete).
  getJSON must return undefined for a missing key. Bunny Storage lists one
  folder at a time, so write a recursive list only if the val calls
  blob.list.
- Replace any other esm.town import with the npm or JSR package it wraps.

Script and database
- bunny scripts create <val-name> --type standalone
- Strip the transaction lines from dump.sql, because Bunny Database runs
  each file in one transaction and rejects a file that opens its own:
    grep -v '^BEGIN TRANSACTION;$\|^COMMIT;$' dump.sql > app.sql
- Create an empty database and import:
    bunny db create --name <val-name> --primary FR --link --token --save-env
    bunny db shell app.sql
- Run SELECT COUNT(*) on every table and show me the results.
- Copy BUNNY_DATABASE_URL and BUNNY_DATABASE_AUTH_TOKEN from .env to the
  script with bunny scripts env set <NAME> <value> --secret.

Blobs
- If the val imports std/blob/main.ts, its blobs are scoped to the val and
  the Val Town API token can't list them. Write a temporary, bearer-token
  protected blob-export.ts for me to add to the val, which returns
  blob.list() with no query string and one blob's body for ?key=. Then
  download every key into ./blobs.
- If it imports std/blob without main.ts, download every key into ./blobs
  with vt.blobs.list() and vt.blobs.get(key) from @valtown/sdk.
- Create an S3-enabled storage zone and copy the files:
    bunny storage zones create <zone> --region DE --s3
    bunny storage zones credentials <zone> --format rclone >> ~/.config/rclone/rclone.conf
    rclone copy ./blobs <zone>:<zone>
- Set BUNNY_STORAGE_ZONE, and BUNNY_STORAGE_PASSWORD with --secret.

Deploy
- Set any other environment variable the val reads, using --secret for
  tokens and passwords. Never print a secret in your output.
- bunny scripts deploy main.ts
- Request each GET route on the val.run URL and the bunny.run URL, and show
  me any response that differs. Ask before sending anything that writes.

Ask me before creating anything on bunny.net, and never delete or change
data on Val Town.
Your agent should stop and ask you to add blob-export.ts to the val, and to approve each bunny.net resource it wants to create.
Your script now sits on the same account as the rest of the bunny.net platform. Bunny DNS is free for up to 500 domains with no query fees, so you can host the domain your old val answered on and point it at the script, and you aren't limited to one script. The pull zone in front of your script is Bunny CDN, and Bunny Shield, Bunny Optimizer, Bunny Stream, and Magic Containers are there when a small project grows into something bigger.
If something in your migration doesn't behave, come and ask in the bunny.net Discord. We'd like to hear which vals you're bringing over, and if any would make good templates for others, reach out and I'll get them added.
Comments require cookies. to view and post.