



Deploy static sites anywhere with the bunny.net CLI

Jamie Barton

Marek Nalikowski

October 8, 2026
If you've hosted a static site on bunny.net, you've probably built your own deploy pipeline to do it. That means creating a storage zone, putting a pull zone in front of it, pointing your domain at it, and writing something to upload each build and purge the cache. There's even a community GitHub Action that handles the upload part.
Today we're introducing bunny sites, a set of commands in the bunny.net CLI that takes care of all of that for you. Run bunny sites deploy in your project, and it puts your build live, creating the storage zone and pull zone on the first deploy. It also detects common frameworks and offers to run the build for you. bunny sites domains add connects your own domain, setting up the DNS record for you if it's on Bunny DNS. And if a release goes wrong, rolling back is one command.
Deploy with one command and connect to GitHub
bunny sites deploy takes the folder your framework builds and ships it on the bunny.net global network:
bunny sites deploy
That one command uploads your build and puts it live. There is no separate publish step and no flag to remember: if the deploy succeeded, your site is serving it. A brand-new site gets a working HTTPS address on b-cdn.net immediately, so there are no DNS records or certificates to sort out before you can look at it.
If you’d prefer not to run the command manually for each deploy, you can connect GitHub with a new GitHub Action. bunny sites ci init scaffolds the workflow using the detected framework conventions, including the output folder and build command. Review the generated workflow and adjust it to fit your setup.
With this workflow, pushes to the main branch go live, and you can trigger a redeploy manually whenever you need one.
name: Deploy site
on:
  push:
    branches: [main]
  workflow_dispatch:

concurrency:
  group: bunny-sites
  cancel-in-progress: false

jobs:
  deploy:
    runs-on: ubuntu-latest
    permissions:
      contents: read
      deployments: write # records the deploy in the repo's Environments
    steps:
      - uses: actions/checkout@v4
      - uses: oven-sh/setup-bun@v2
      - run: bun install --frozen-lockfile
      - run: bun run build
      - uses: BunnyWay/actions/deploy-site@deploy-site_0.1.1
        with:
          site: my-site
          directory: dist
          api_key: ${{ secrets.BUNNYNET_API_KEY }}
Atomic deploys and instant rollback
Deploys are immutable. Each one is identified by your Git commit or a hash of its contents, so deploying the same output twice does nothing, and publishing never overwrites files in place. Publishing is a pointer flip and a cache purge, which means the site switches over atomically, with no window where visitors see half of one deploy and half of another.
It also means rolling back is instant. Every deploy you've shipped is still there, so undoing a bad release is one command:
bunny sites deployments list
bunny sites deployments publish --previous
No rebuild, no re-upload. The previous deploy is live again in seconds.
Bring your own framework
Developer tooling changes. Frameworks come and go, and we don't believe you should have to rebuild your project around a platform to deploy it.
If your framework generates static files, it works with bunny sites. Astro, Hugo, Jekyll, Gatsby, Eleventy, Docusaurus, Gridsome, or any other static site generator: we deploy the output. The CLI also detects common frameworks and offers to run the build for you.
Single-page apps work too. When the CLI recognizes a client-routed framework such as Vite, Angular, or React Router, or spots a build that looks like one, it configures the site to serve index.html for unknown paths, so a deep link survives a refresh. A 404.html in your build output becomes the not-found page for everything else.
How it works
bunny sites is glue around Storage, CDN, and DNS. There's no new hosting platform underneath, just the primitives developers have been stitching together themselves, wired up so you don't have to.
Creating a site provisions two things:
- a storage zone to hold your deploys,
- and a pull zone in front of it, with a handful of edge rules that decide which deploy answers each request.
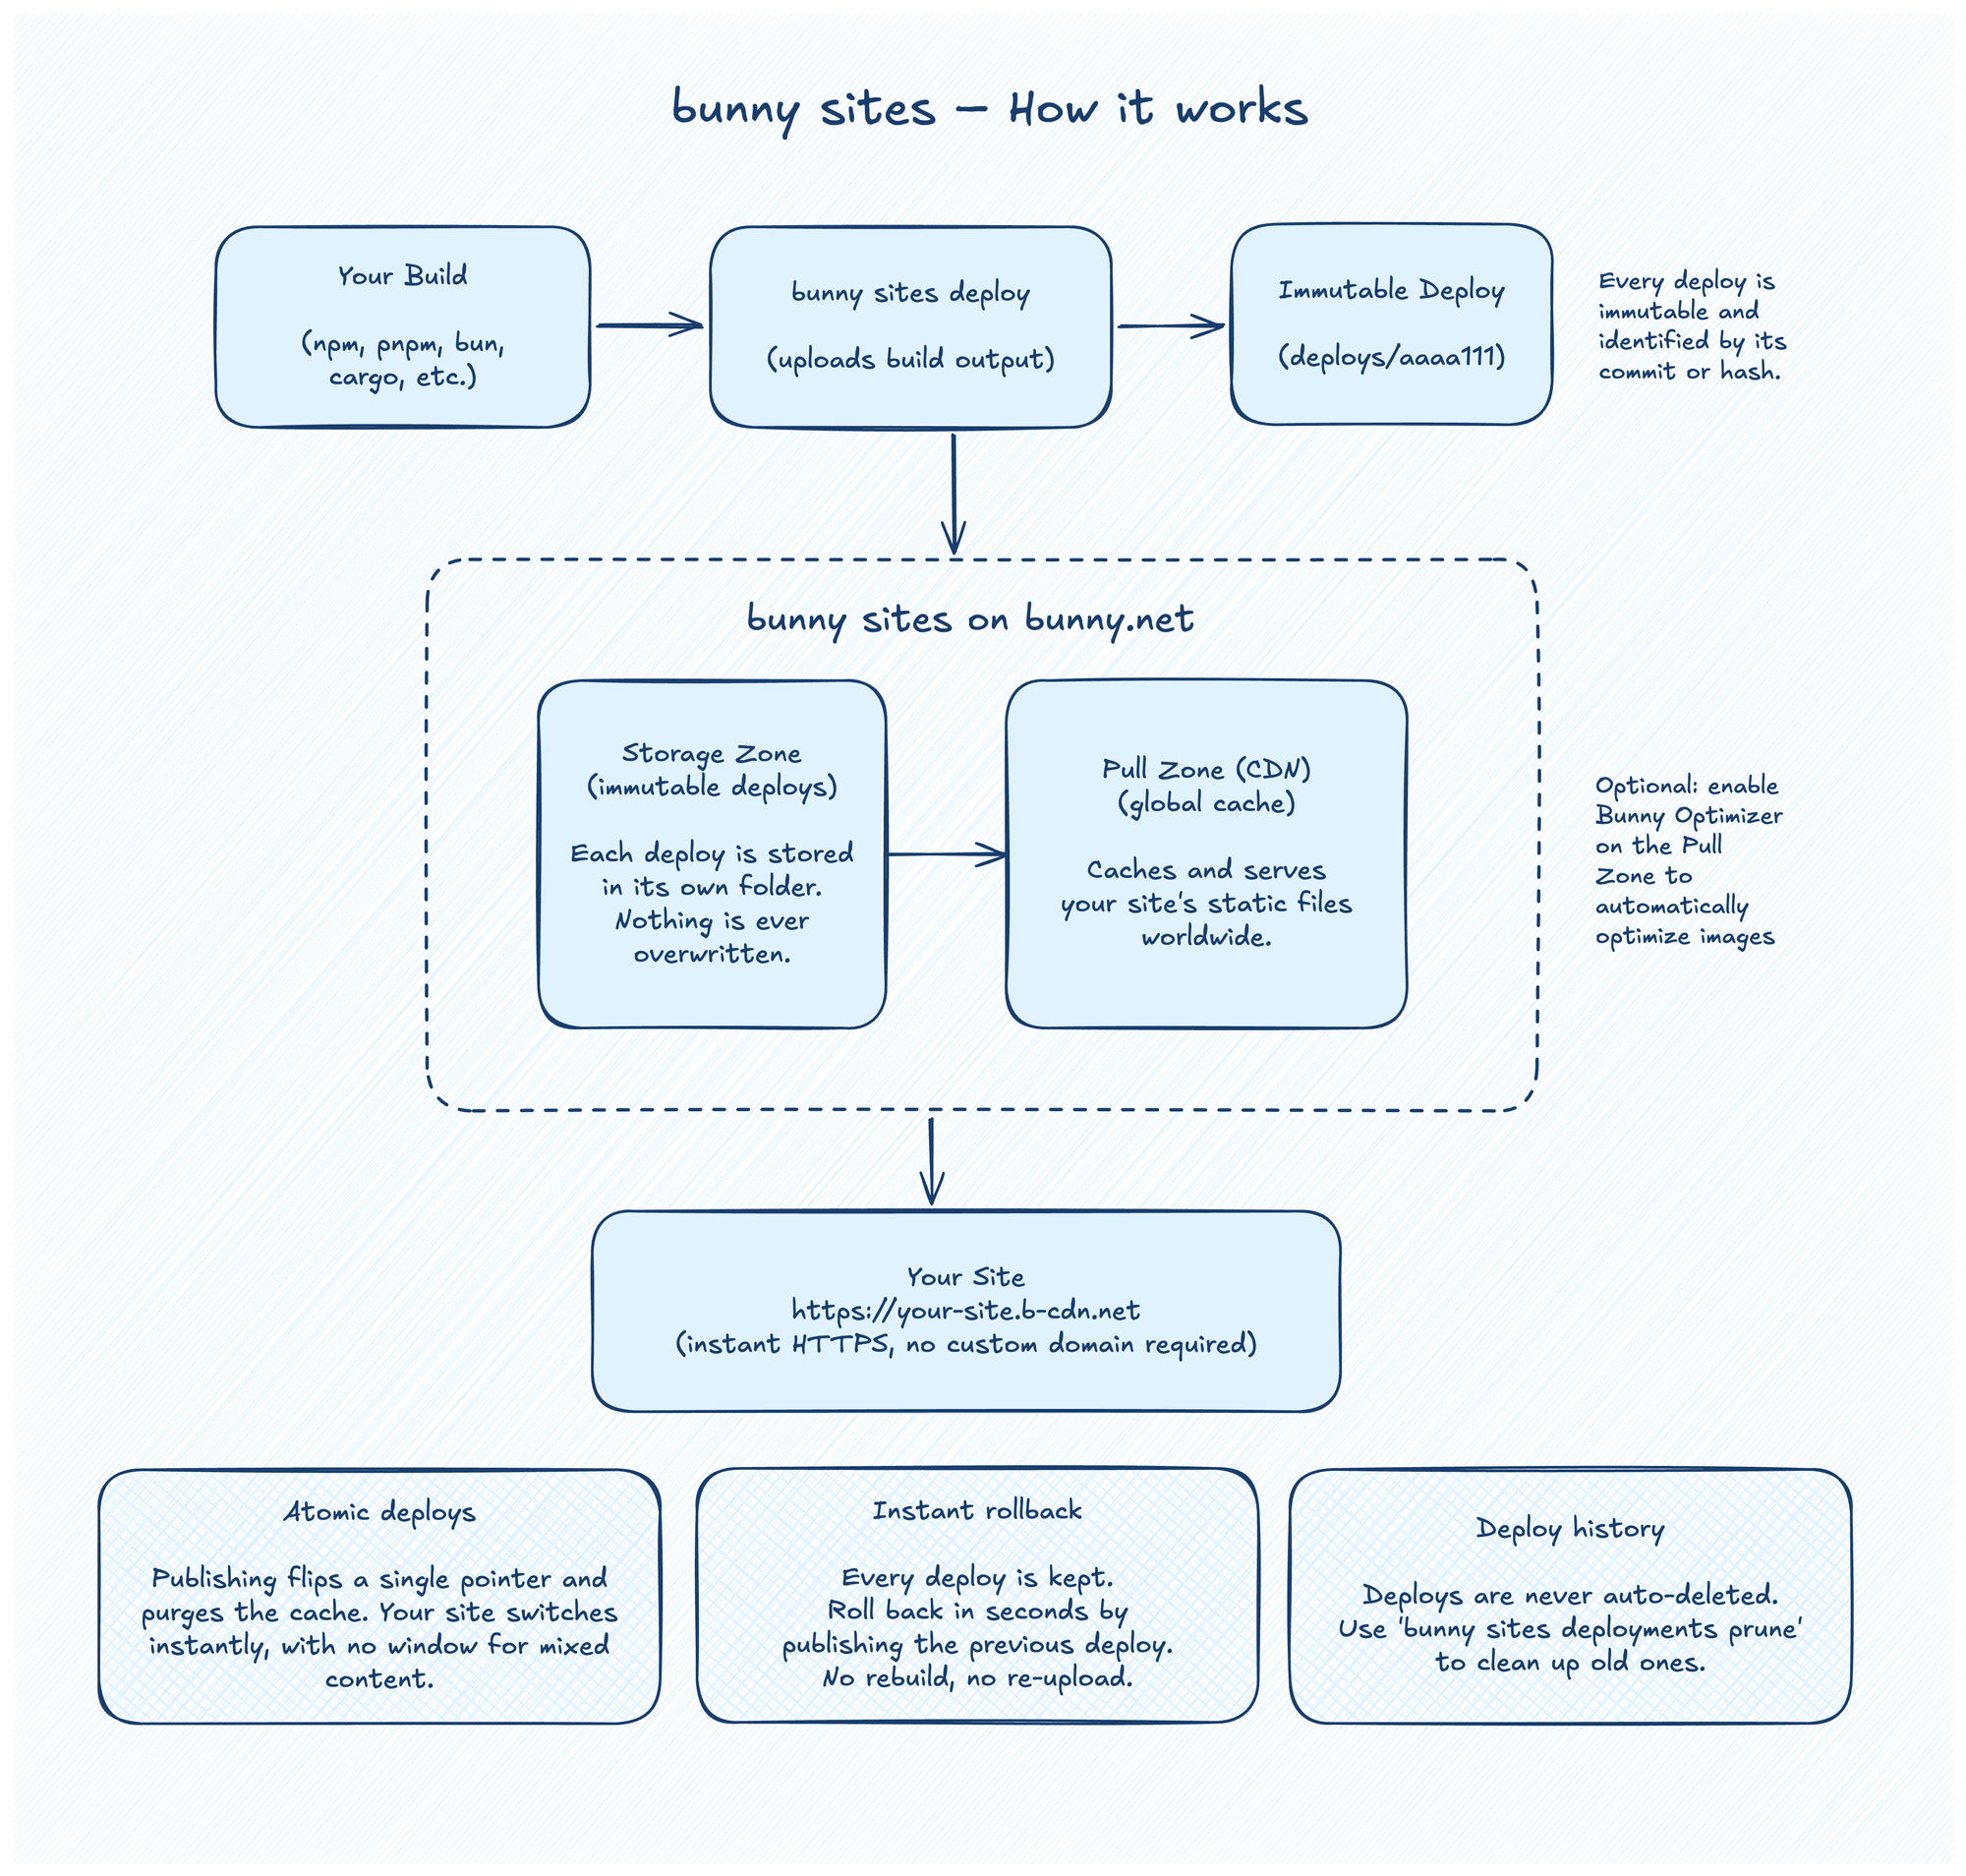
Every deploy is uploaded to its own folder in the storage zone, named after your Git commit or a hash of its contents. Nothing in that folder is ever overwritten. One edge rule on the pull zone rewrites the incoming path into the live deploy's folder, so your site is always served from the root exactly as your framework built it. The CDN caches and serves the files directly from there, and a second rule blocks anyone from reaching a deploy folder by its internal path.
Publishing retargets that one rule and purges the cache, which is why going live and rolling back both take effect everywhere at once without a file moving.
Attach a custom domain with bunny sites domains add yourdomain.com to give production a proper address. If the domain is on Bunny DNS, the CLI offers to point the record at your site and issues the free SSL certificate; otherwise it prints the exact CNAME to set. Your site's b-cdn.net address keeps working either way.
Because deploys are never deleted automatically, deploy history accumulates over time. When you want to tidy up, bunny sites deployments prune clears out old deploys, always keeps your most recent ones, and never touches the deploy that's live or the one before it, so rollback always works.
Framework detection works much the same way you would do it by hand. When you run a deploy in a project the CLI hasn't seen before, it inspects the project to work out which framework you're using and where its build output lands, then offers to run the build and deploy the result.
We don't build your site, we deliver it
We stick to our platform primitives and give developers the resources to build and deploy in whatever way suits them.
You control the build in whatever CI provider and toolchain you already use, whether that's npm, pnpm, Bun, Cargo, or a Makefile, and bunny sites deploy puts the files you give it in the right place across our global edge network.
Because it's built on the same infrastructure developers already trust, nothing is hidden behind an abstraction. You can enable and tune any feature of Bunny CDN, DNS, and Storage, and add products like Stream and Edge Scripting alongside your site as it grows.
Pay as you serve
Deploying withbunny sites doesn't introduce a new pricing model. You pay for the underlying bunny.net primitives:
- Storage: $0.01 per GB per month (standard tier, single region). Deploys are static files, so most sites cost fractions of a cent to store, even with previous deploys kept around for instant rollback.
- CDN: from $0.01 per GB of bandwidth (Europe & North America; other regions range up to $0.06/GB), with no per-request fees. Traffic between Storage and the CDN is free.
- DNS: free. Custom domains run on Bunny DNS at no cost, with unlimited queries.
Because everything is pay-as-you-go, your costs track actual traffic. A small site serving a few GB each month typically costs only a few cents. There's no idle charge for a site nobody visits beyond the $1 monthly account minimum. Delete a site and its zones, and it stops costing you anything.
Get started
Install the bunny.net CLI and log in:
npm install -g @bunny.net/cli
bunny login
Here's a real blog going onto the edge, using Astro's blog template. If Jekyll, Hugo, or Eleventy is more your thing, the steps are identical: build, deploy, done.
Scaffold the blog:
npm create astro@latest my-blog -- --template blog
cd my-blog
That gives you a complete blog with a few example posts, RSS, and a sitemap. Run npm run dev to have a look around, write a post if you like, then deploy it:
bunny sites deploy --build
Your first deploy creates the site and provisions the storage zone and pull zone. The CLI detects Astro, runs the build, uploads the output, and puts the site live. With no custom domain at this point, it offers to attach one before it finishes.
Every later deploy is the same command. Deploy the same output again and nothing is re-uploaded at all, because the deploy is identified by its contents.
When you want production on your own domain:
bunny sites domains add yourdomain.com
You can then run bunny sites ci init to wire up GitHub. Every merge to main ships to production, and you can trigger a redeploy by hand whenever you need one.
Faster images with Bunny Optimizer
Static builds are usually stuck with whatever image sizes the build produced. Because every site sits on a regular pull zone, you can turn on Bunny Optimizer and resize images at the edge instead. Point your framework's image loader at it, and each srcset width becomes a URL like /images/hero.png?width=640.
Next.js, Astro, Angular, and Nuxt all have a loader hook for this, and our static site examples include a small helper for 21 frameworks, off by default:
bunny sites deploy --build --env VITE_BUNNY_OPTIMIZER=true
Optimizer is an optional add-on at $9.50 a month per site.
What's next for bunny sites
For now, deploying static sites is CLI only, but we're experimenting with bringing it to the dashboard.
We're also actively working on deploying Edge Scripts automatically when you run bunny sites deploy, so when your site needs a form handler or other server-side code, it's right there alongside it. And for full server-side rendering, we're experimenting with support for SSR frameworks on Edge Scripting.
If any of this sounds interesting, let us know on Discord.
Putting the bunny.net stack in your terminal
bunny sites joins a growing set of CLI capabilities that let you and your agent use our platform from the terminal:
- Manage and query Bunny Database, plus handle database migrations
- Build and deploy edge functions
- Manage Bunny DNS
- Manage Bunny Storage
- Run code and agents in Bunny Sandbox
Support for Bunny Stream and Magic Containers Apps is coming next.
The CLI is open source and built in public. If you've deployed something with bunny sites, come and tell us about it in Discord.
Comments require cookies. to view and post.